← Blog
[Written by]

8 Cinematic Lighting Prompts For AI Portraits
None of the prompts below describe the woman in the pictures. They describe the light: where it sits, how large it is, how hard it falls, and what it is allowed to leave in shadow. Run every prompt against the same original image reference, never against the previous output.

01. Split
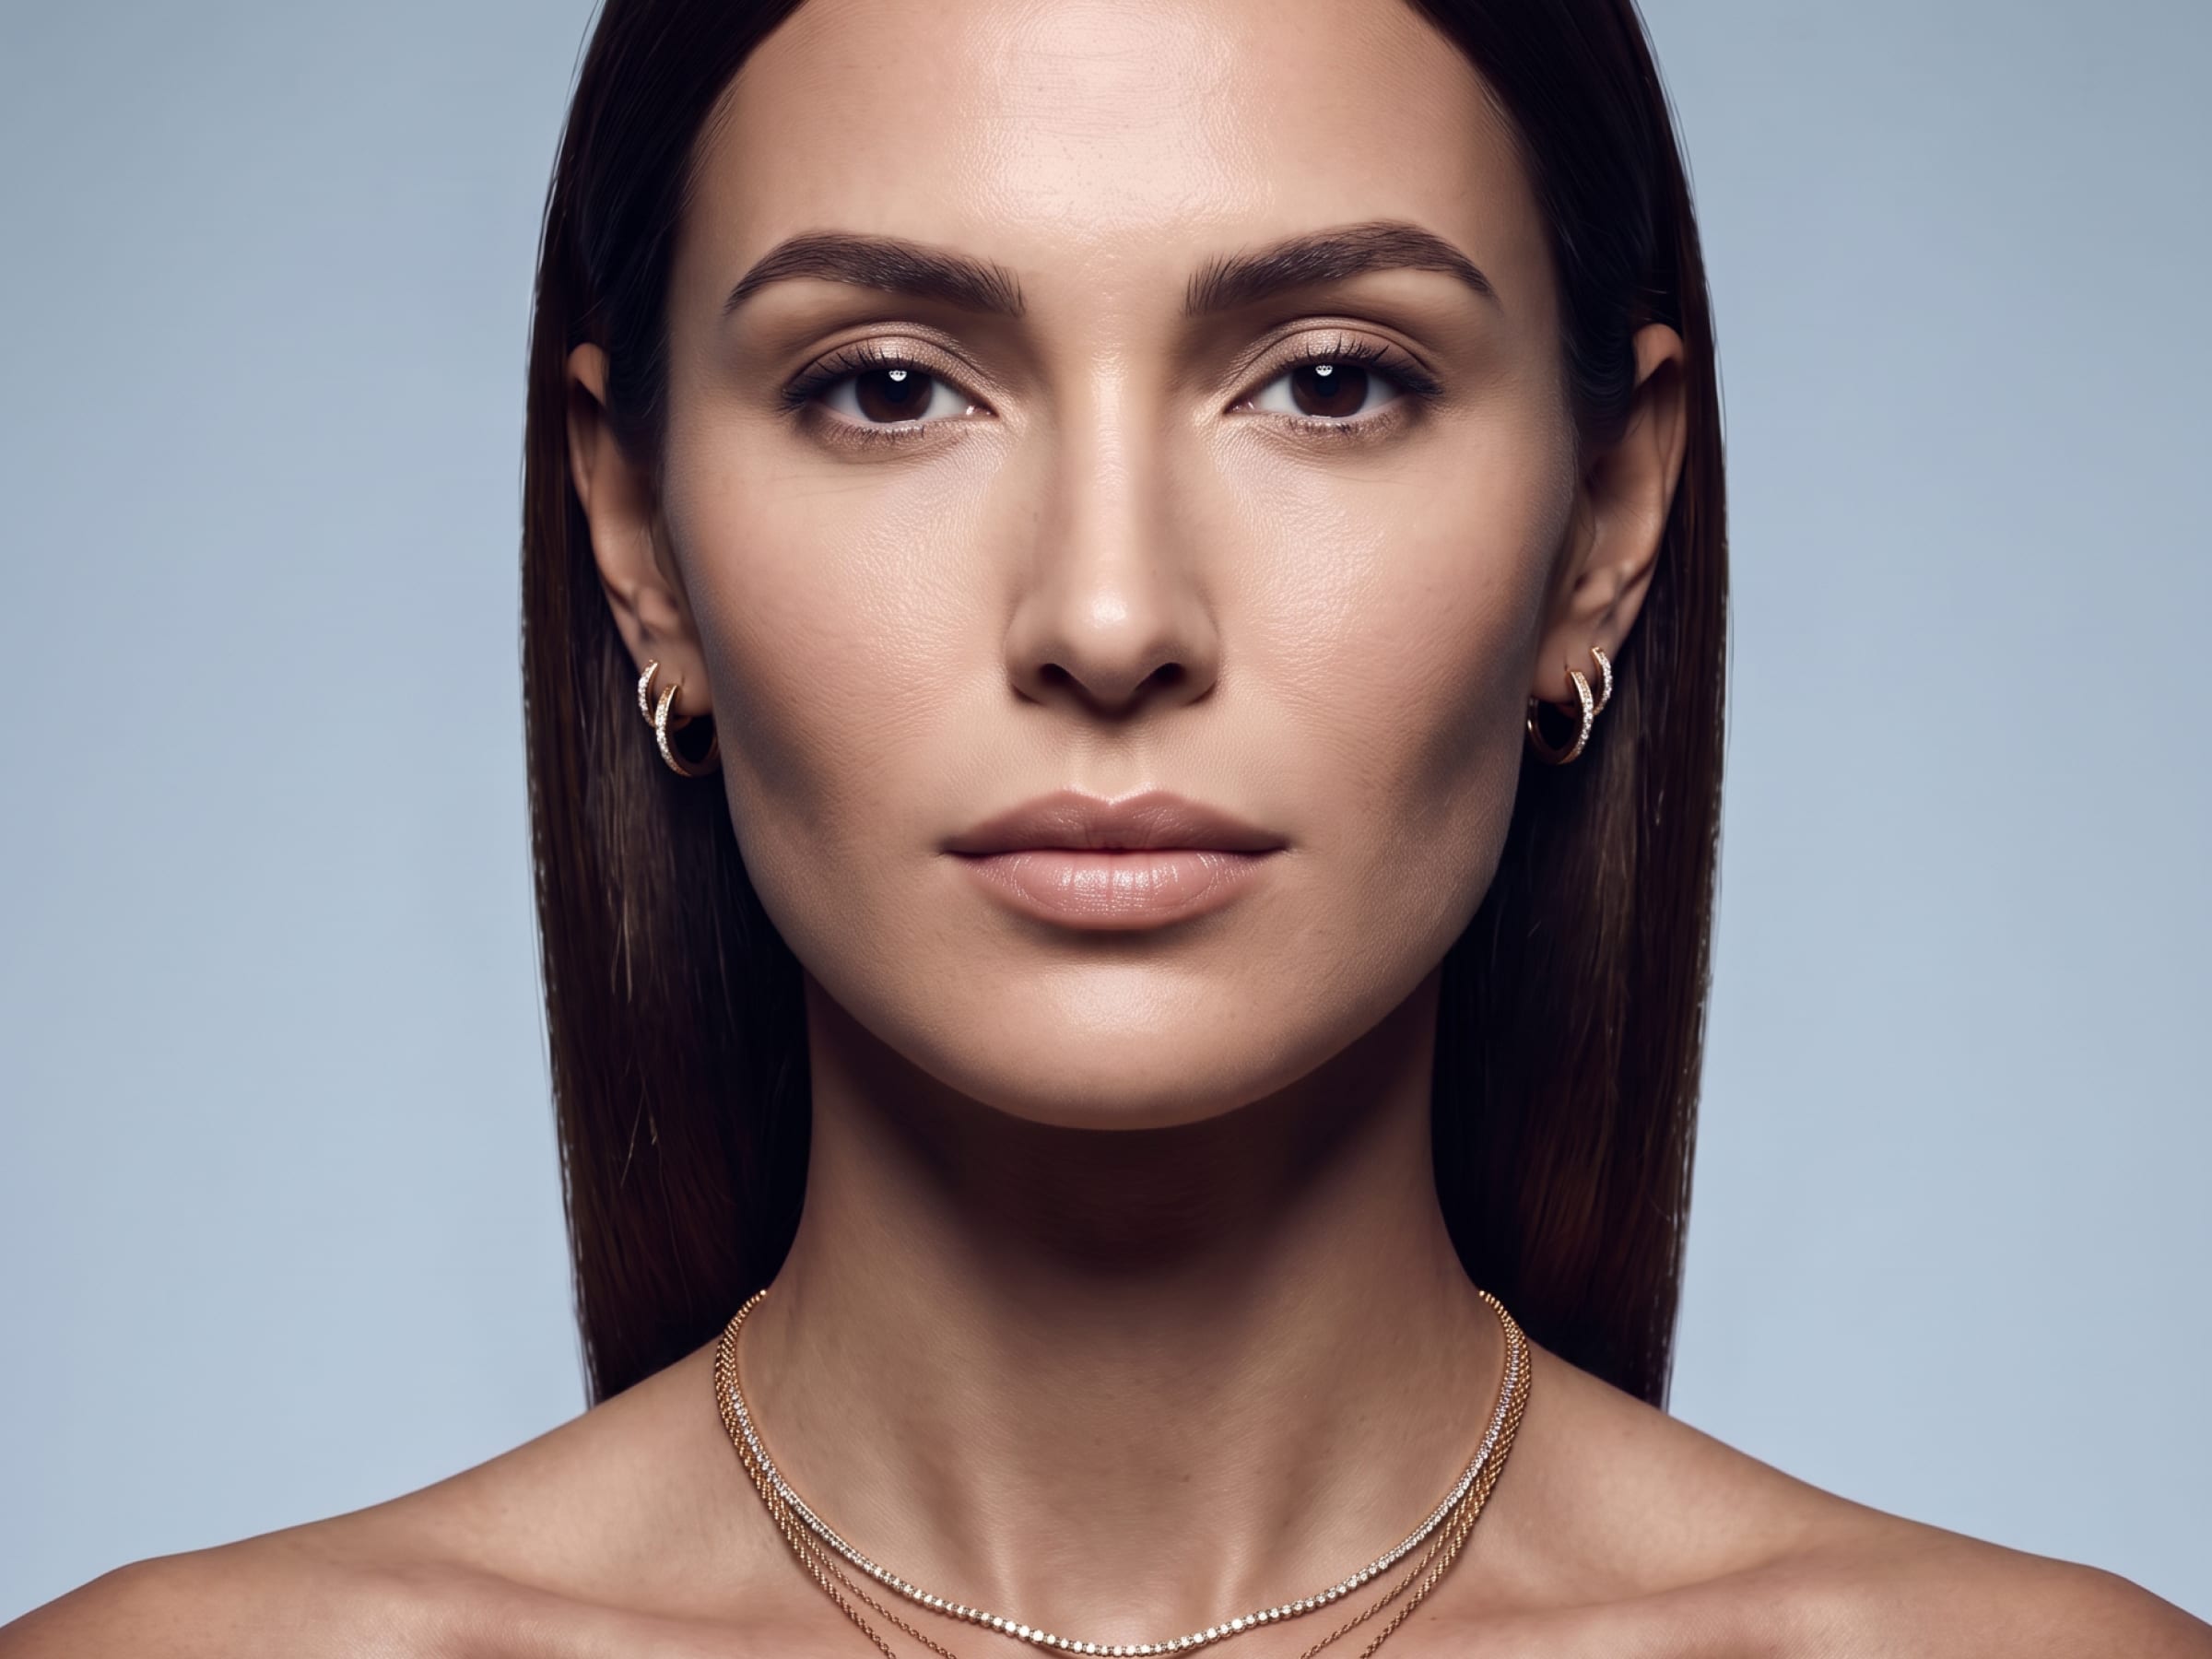
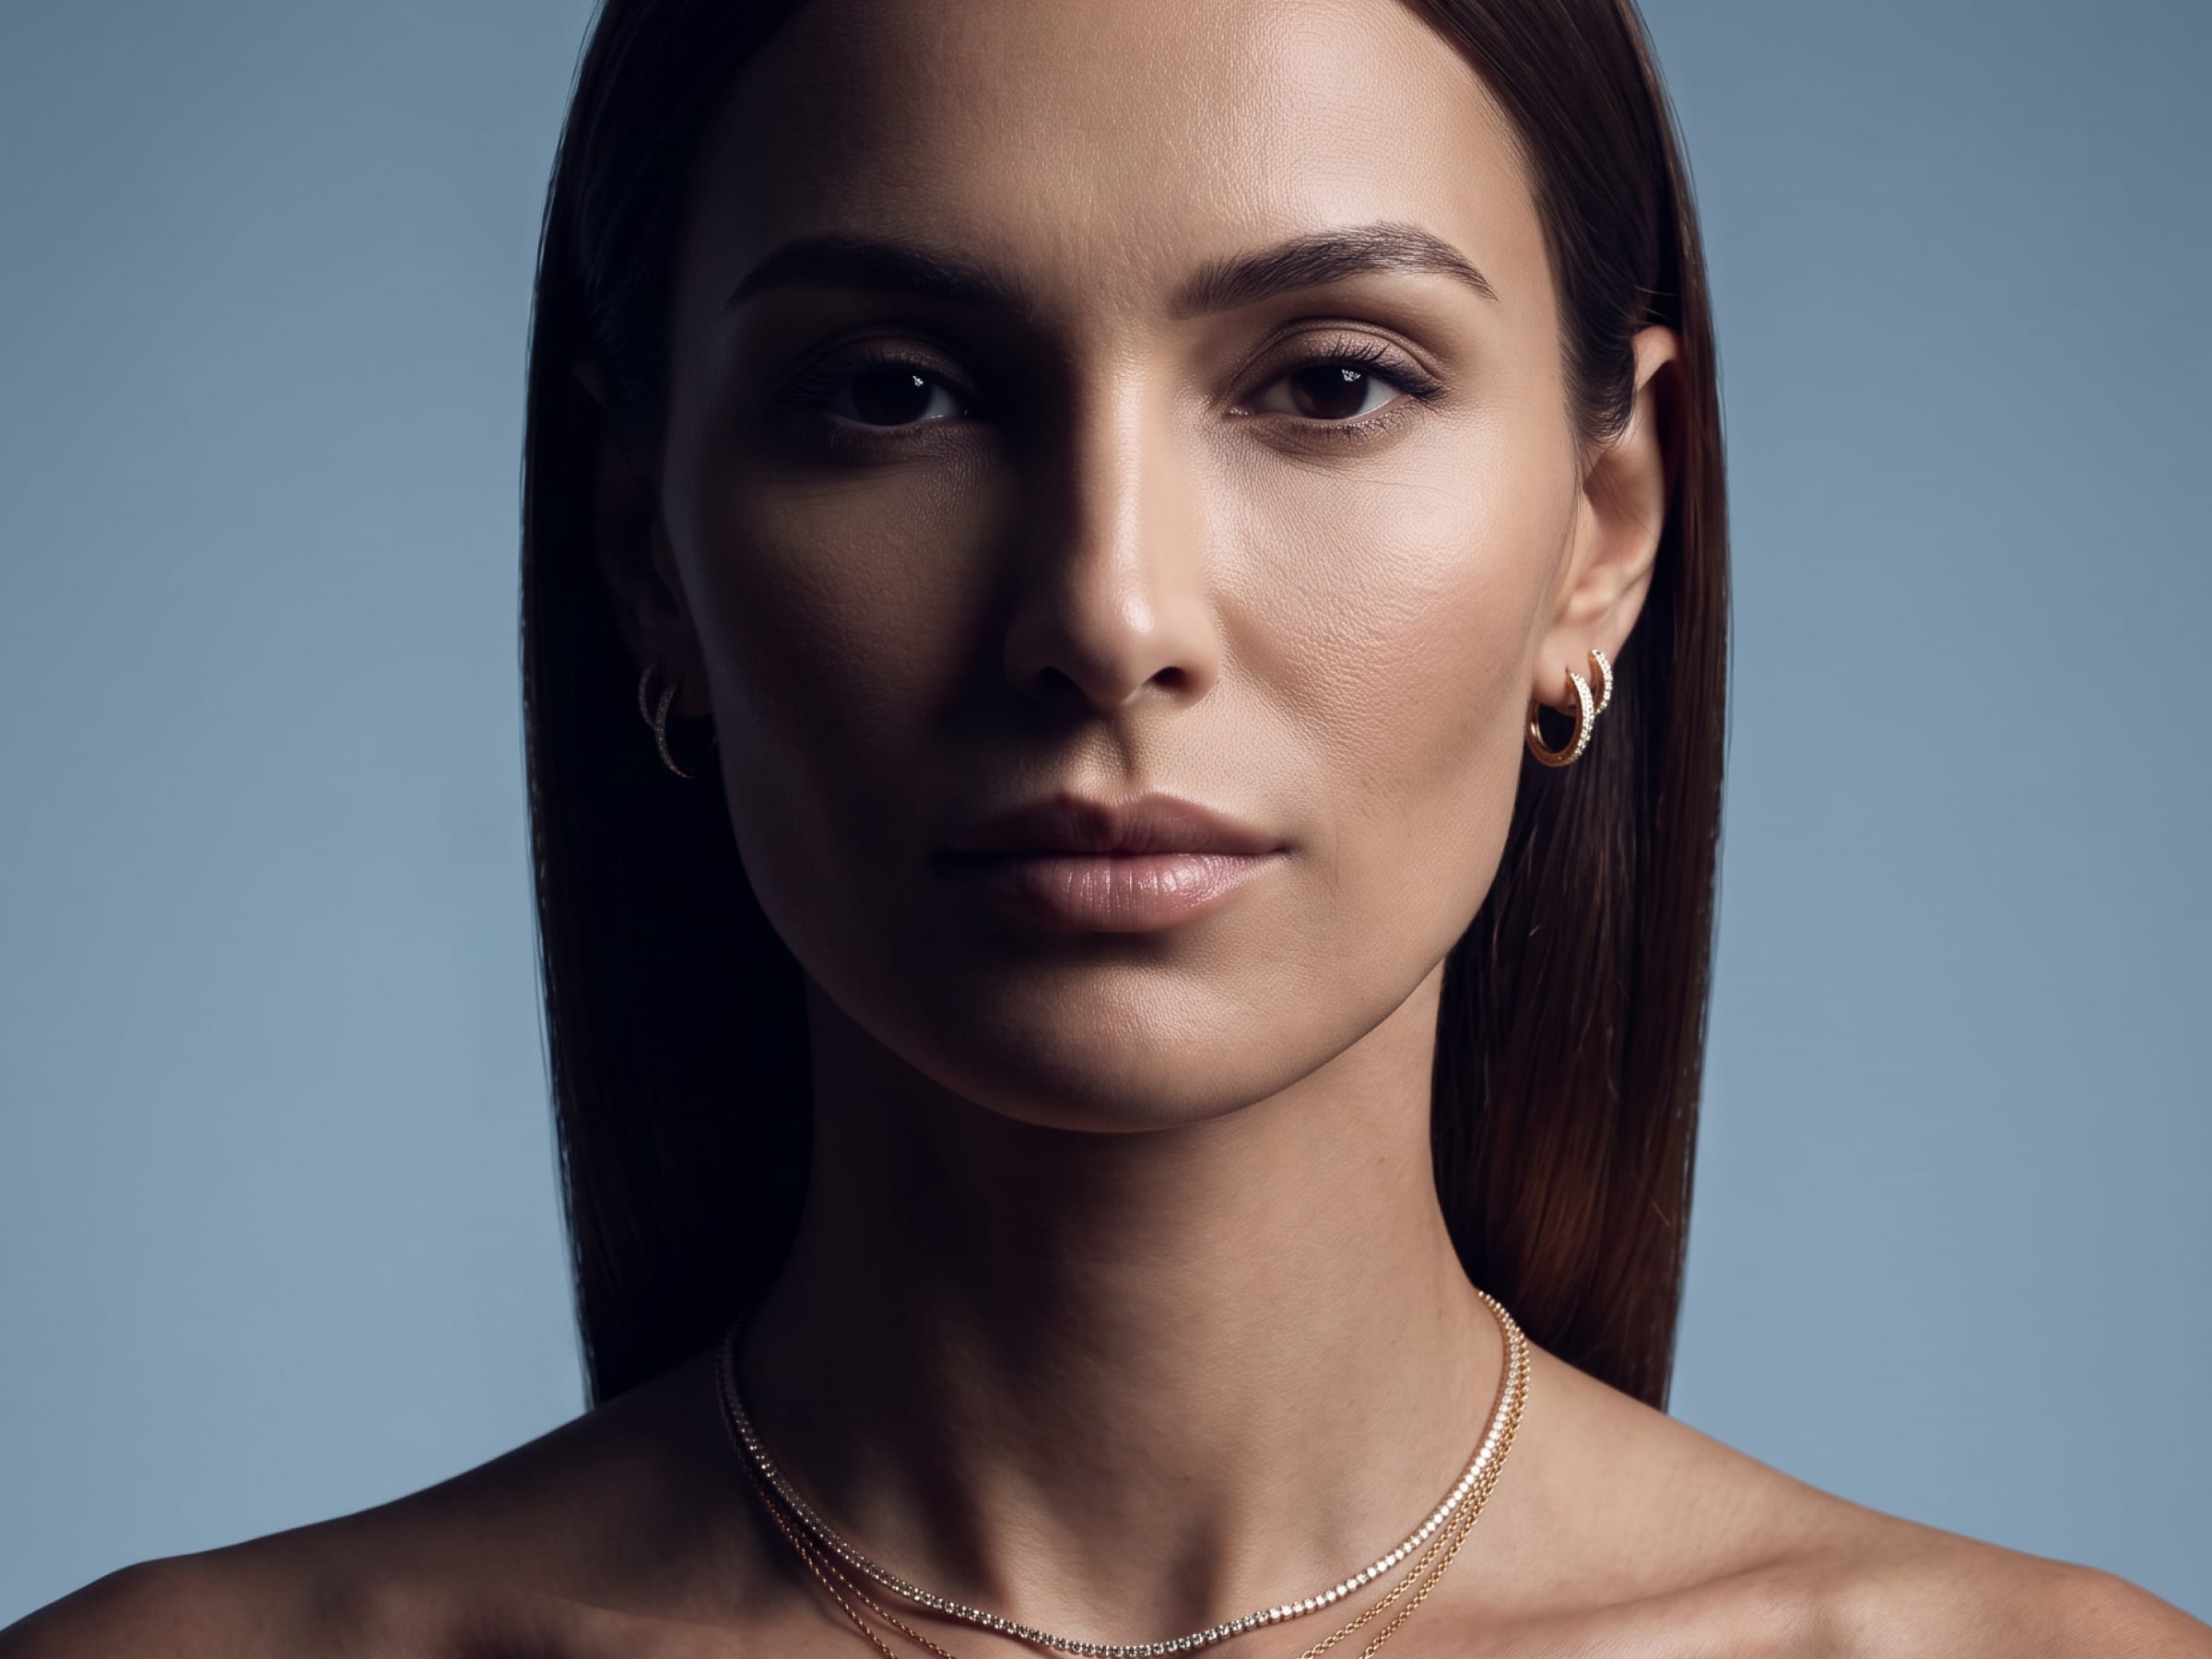 [Before][After]
Relight the uploaded portrait using authentic photographic split lighting while preserving the original subject, identity, facial features, expression, pose, hairstyle, clothing, jewelry, composition, background, and image proportions.
Place a single directional key light approximately 90 degrees to one side of the subject at face level. Illuminate one side of the face while allowing the opposite side to fall naturally into deep shadow.
The transition between light and shadow must follow the real three-dimensional contours of the forehead, brow ridge, bridge of the nose, lips, cheekbones, chin, neck, shoulders, and collarbones. Do not create a straight vertical division, graphic mask, artificial line, or symmetrical half-and-half effect.
Keep the illuminated eye clearly visible with a subtle catchlight. The shadow-side eye may remain darker but should retain faint natural detail. Use strong cinematic contrast, minimal ambient fill, realistic skin texture, controlled highlights, and smooth natural light falloff.
The result should look like the original photograph was captured with one professional side light positioned directly beside the model.
Do not alter the subject’s face, anatomy, pose, wardrobe, jewelry, background, framing, or camera perspective. No vertical light strip, no hard digital masking, no artificial symmetry, no visible light source, no haze, no glossy skin, and no beauty retouching.
02. Underlighting
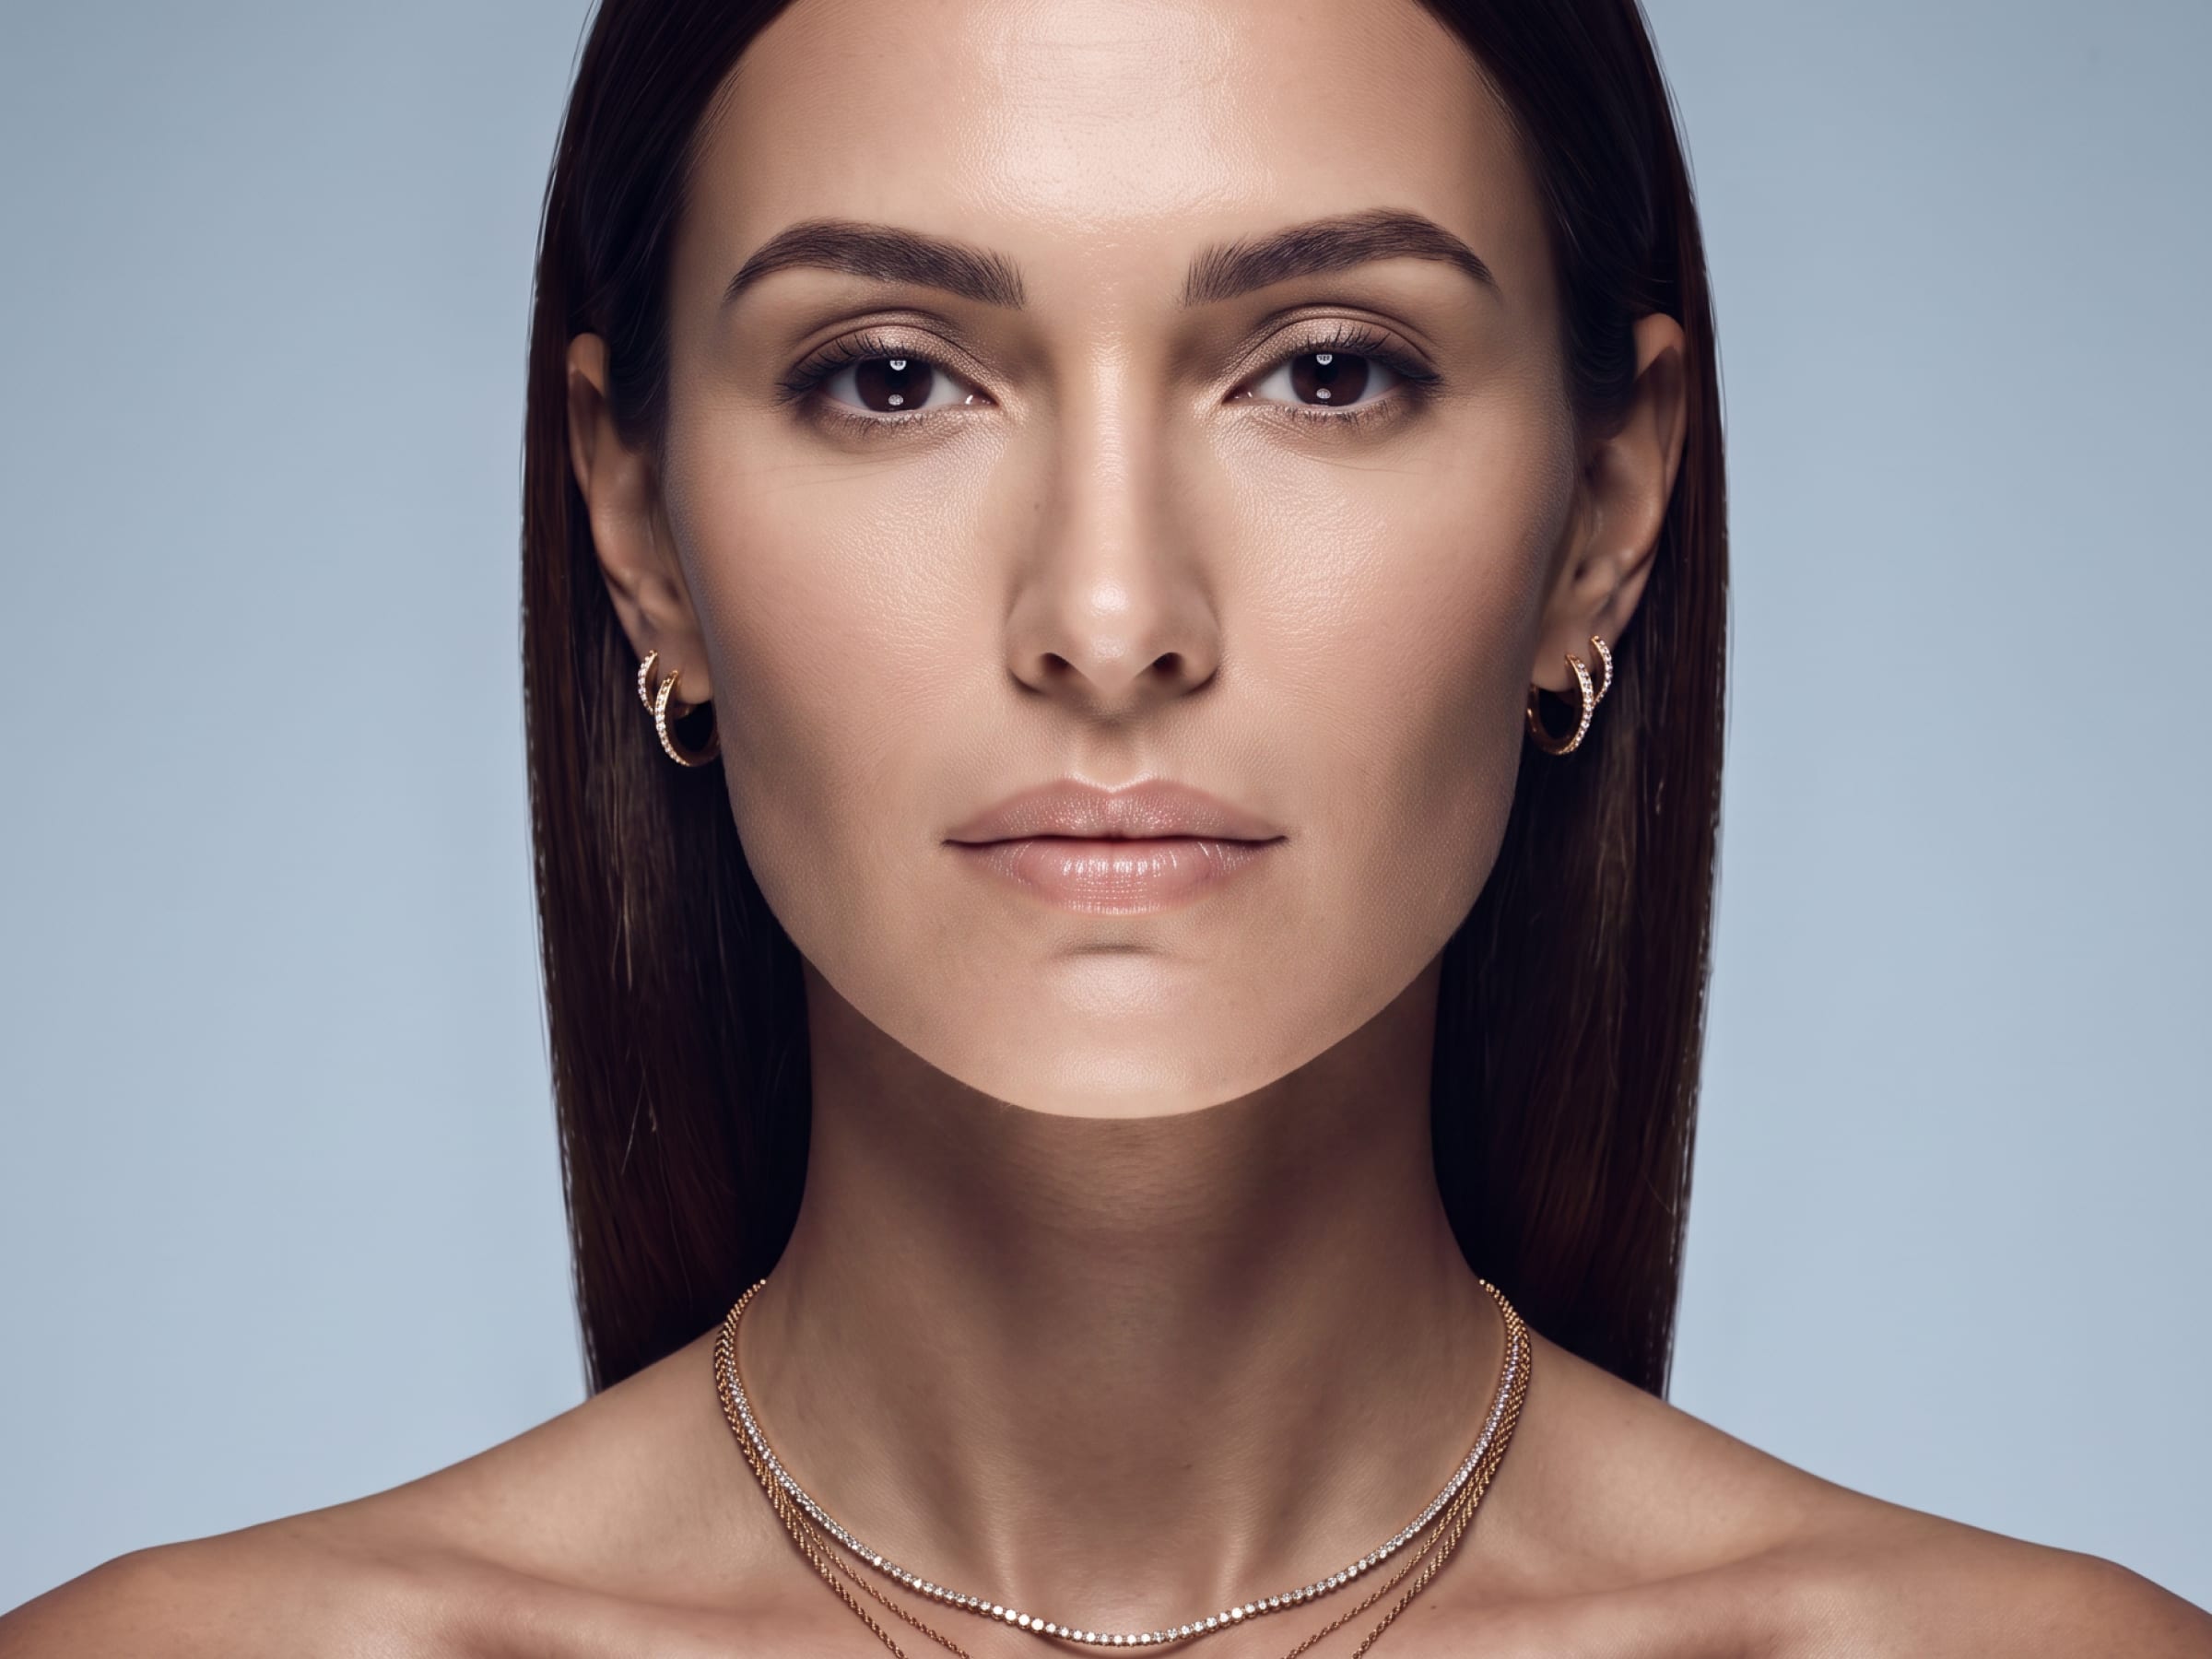 [Before][After]
Relight the uploaded portrait using authentic photographic underlighting while preserving the original subject, facial identity, expression, pose, hairstyle, clothing, jewelry, camera angle, composition, background, and image proportions.
Position one controlled directional key light below the subject’s face, angled upward from beneath chin level. Illuminate the underside of the chin, jawline, lips, nose, cheekbones, and brow ridge while allowing natural shadows to form upward across the face. Create a dramatic, cinematic result with clear upward light direction and realistic three-dimensional facial modelling.
The light must follow the subject’s actual anatomy. Shadows should form naturally above the nose, beneath the brows, around the eye sockets, and along the upper cheek structure. Maintain visible facial detail, realistic skin texture, restrained highlights, controlled contrast, and subtle ambient fill so the face remains readable.
Do not create a glowing face, flat upward wash, artificial shadow mask, fantasy lighting, or exaggerated horror effect. Do not alter the subject’s identity, facial structure, anatomy, pose, wardrobe, jewelry, background, framing, or lens perspective. No visible light source, no coloured glow, no haze, no glossy artificial skin, and no beauty retouching. The final result should look like the original photograph was professionally captured with a single light placed below the subject.
03. Rembrandt
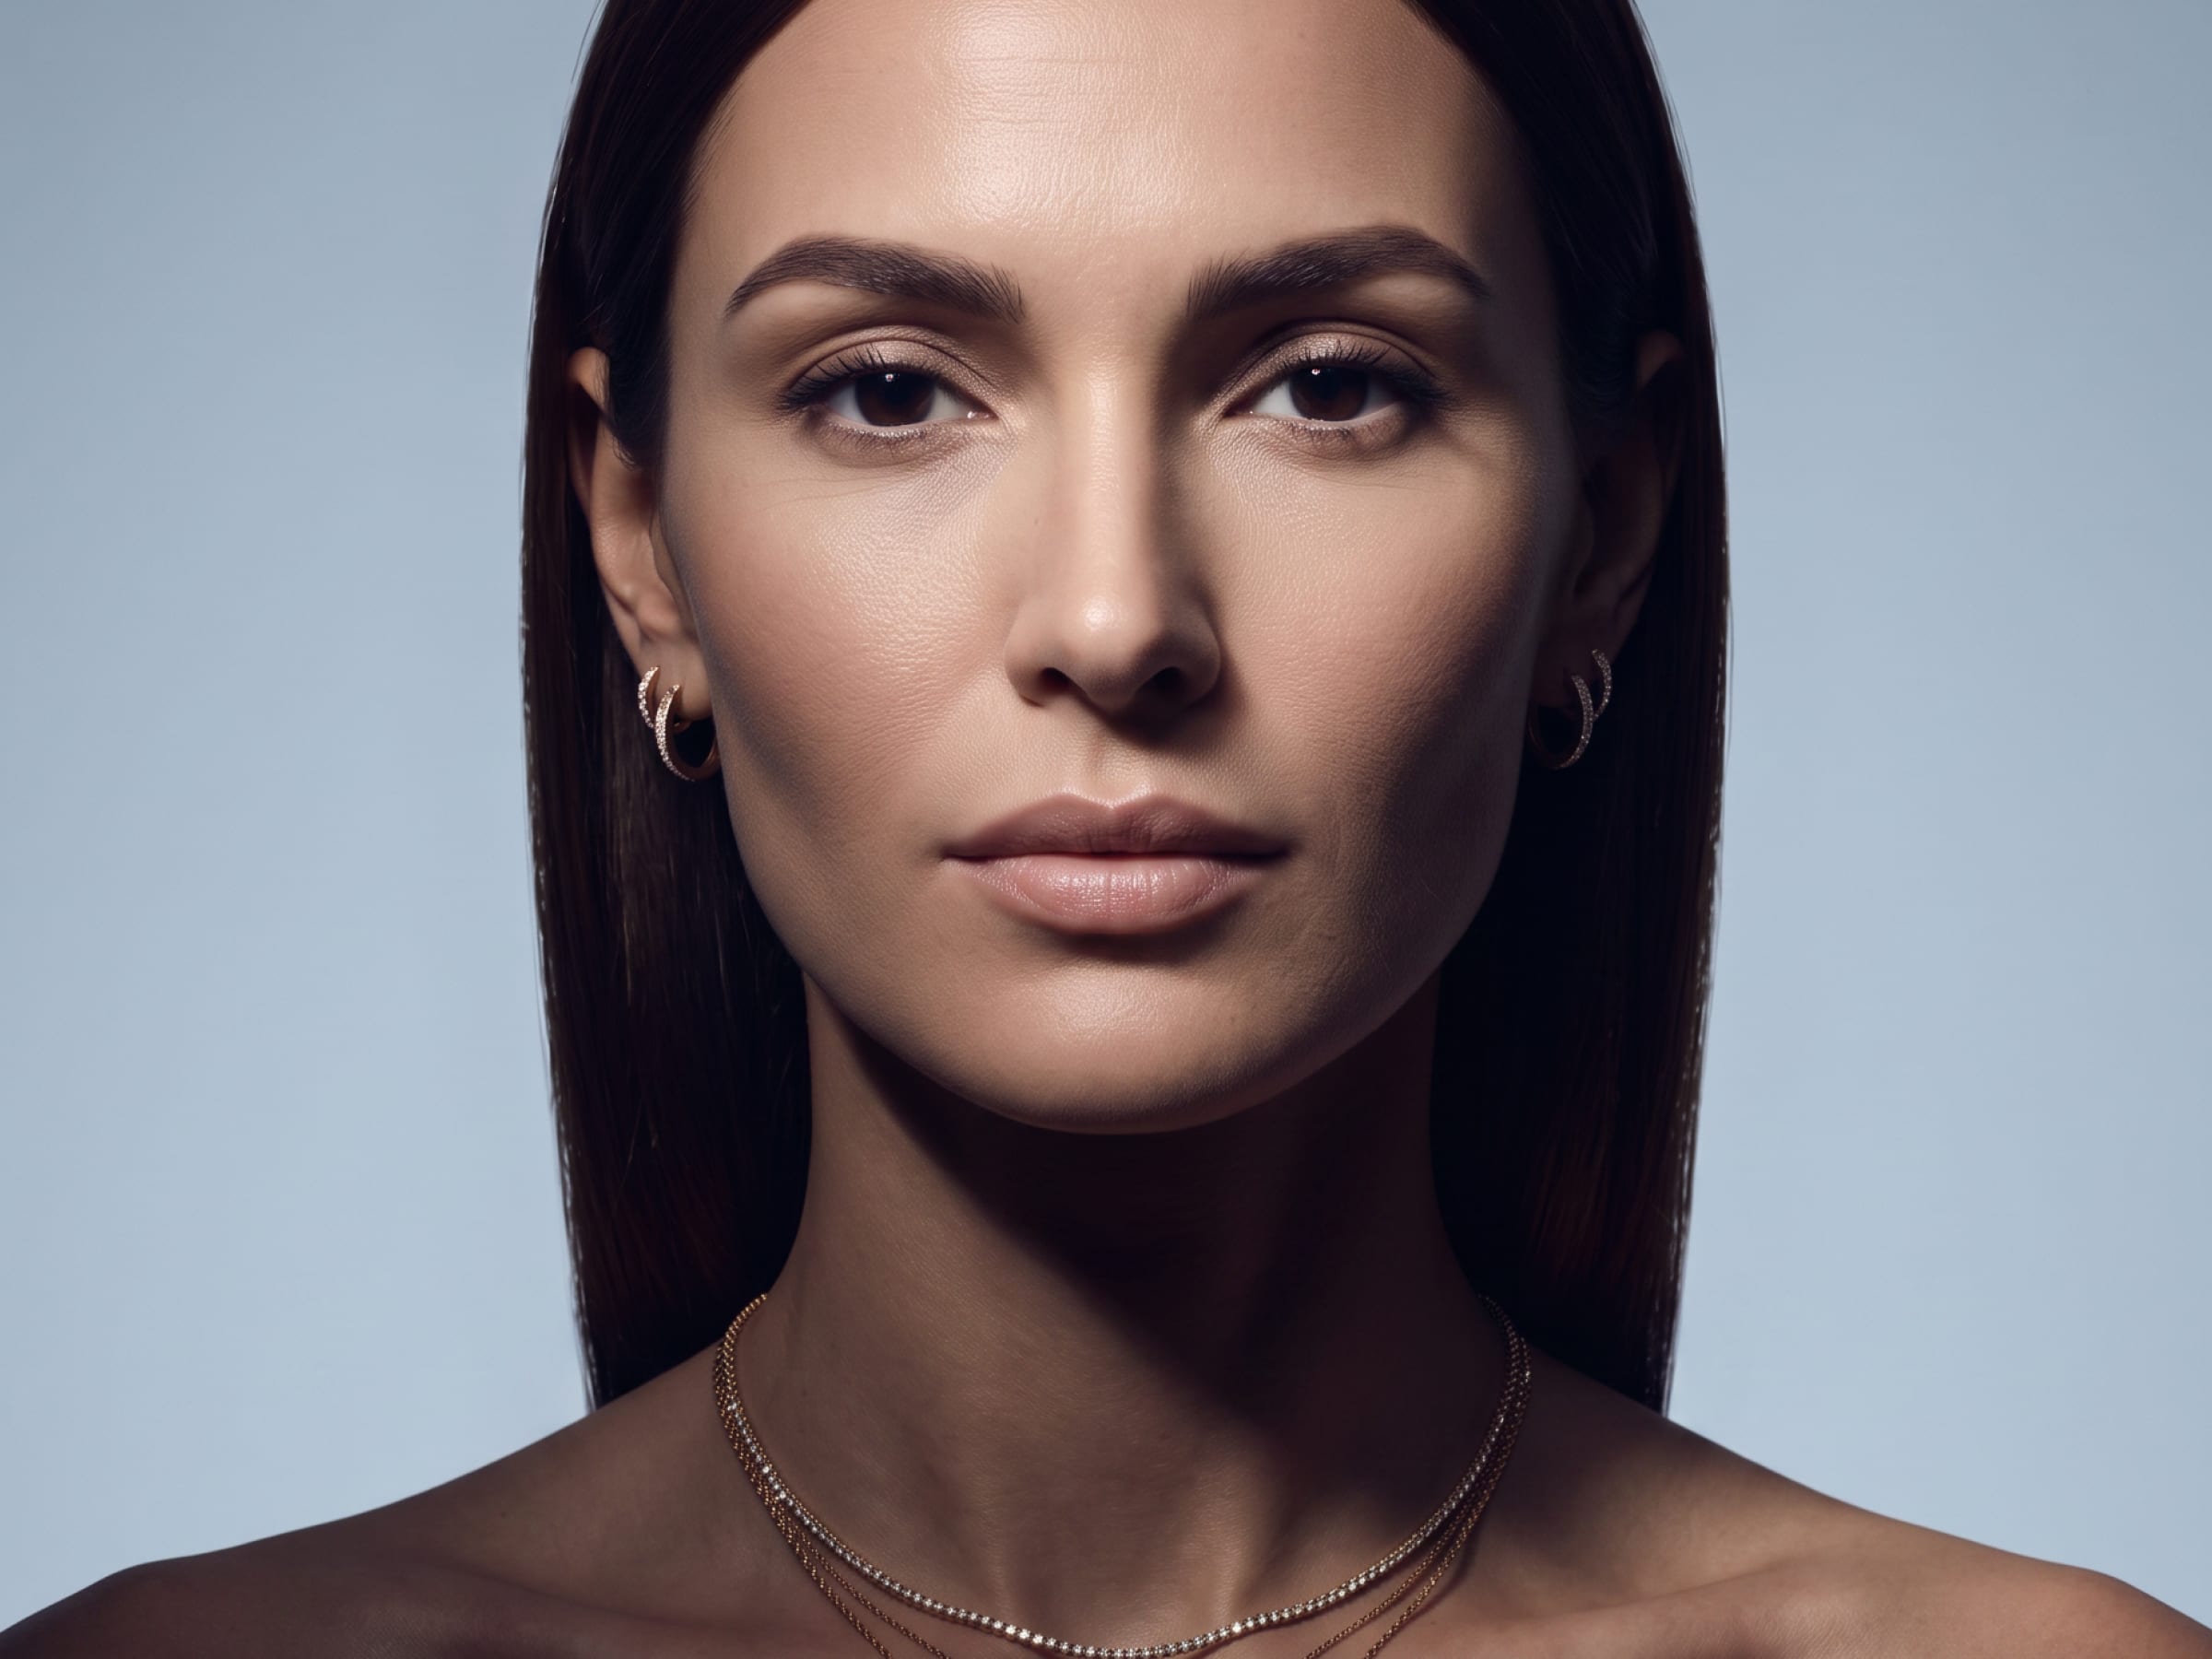 [Before][After]
Relight the uploaded portrait using authentic cinematic Rembrandt lighting while preserving the original subject, facial identity, expression, pose, clothing, hairstyle, camera angle, composition, background, and image proportions.
Place one soft directional key light approximately 45 degrees to one side of the face and slightly above eye level. Create a distinct but natural inverted triangle of light beneath the eye on the shadow side, formed by the nose shadow connecting subtly with the cheek shadow. Keep the illuminated side of the face gently sculpted and the opposite side rich in controlled shadow.
Use smooth realistic light falloff, restrained ambient fill, subtle catchlights, natural skin tones, dimensional facial contours, and deep cinematic contrast without crushing shadow detail. Allow the light to interact accurately with the subject’s skin, hair, clothing, and surrounding environment. Maintain realistic exposure and photographic texture.
Do not alter the subject’s identity, facial structure, body, pose, wardrobe, background elements, lens perspective, or framing. Do not add visible lamps, artificial light beams, excessive haze, orange colour casts, glossy skin, beauty retouching, or theatrical effects. The result should look like the original photograph was professionally captured with a carefully controlled Rembrandt lighting setup.
04. Rim light
 [Before][After]
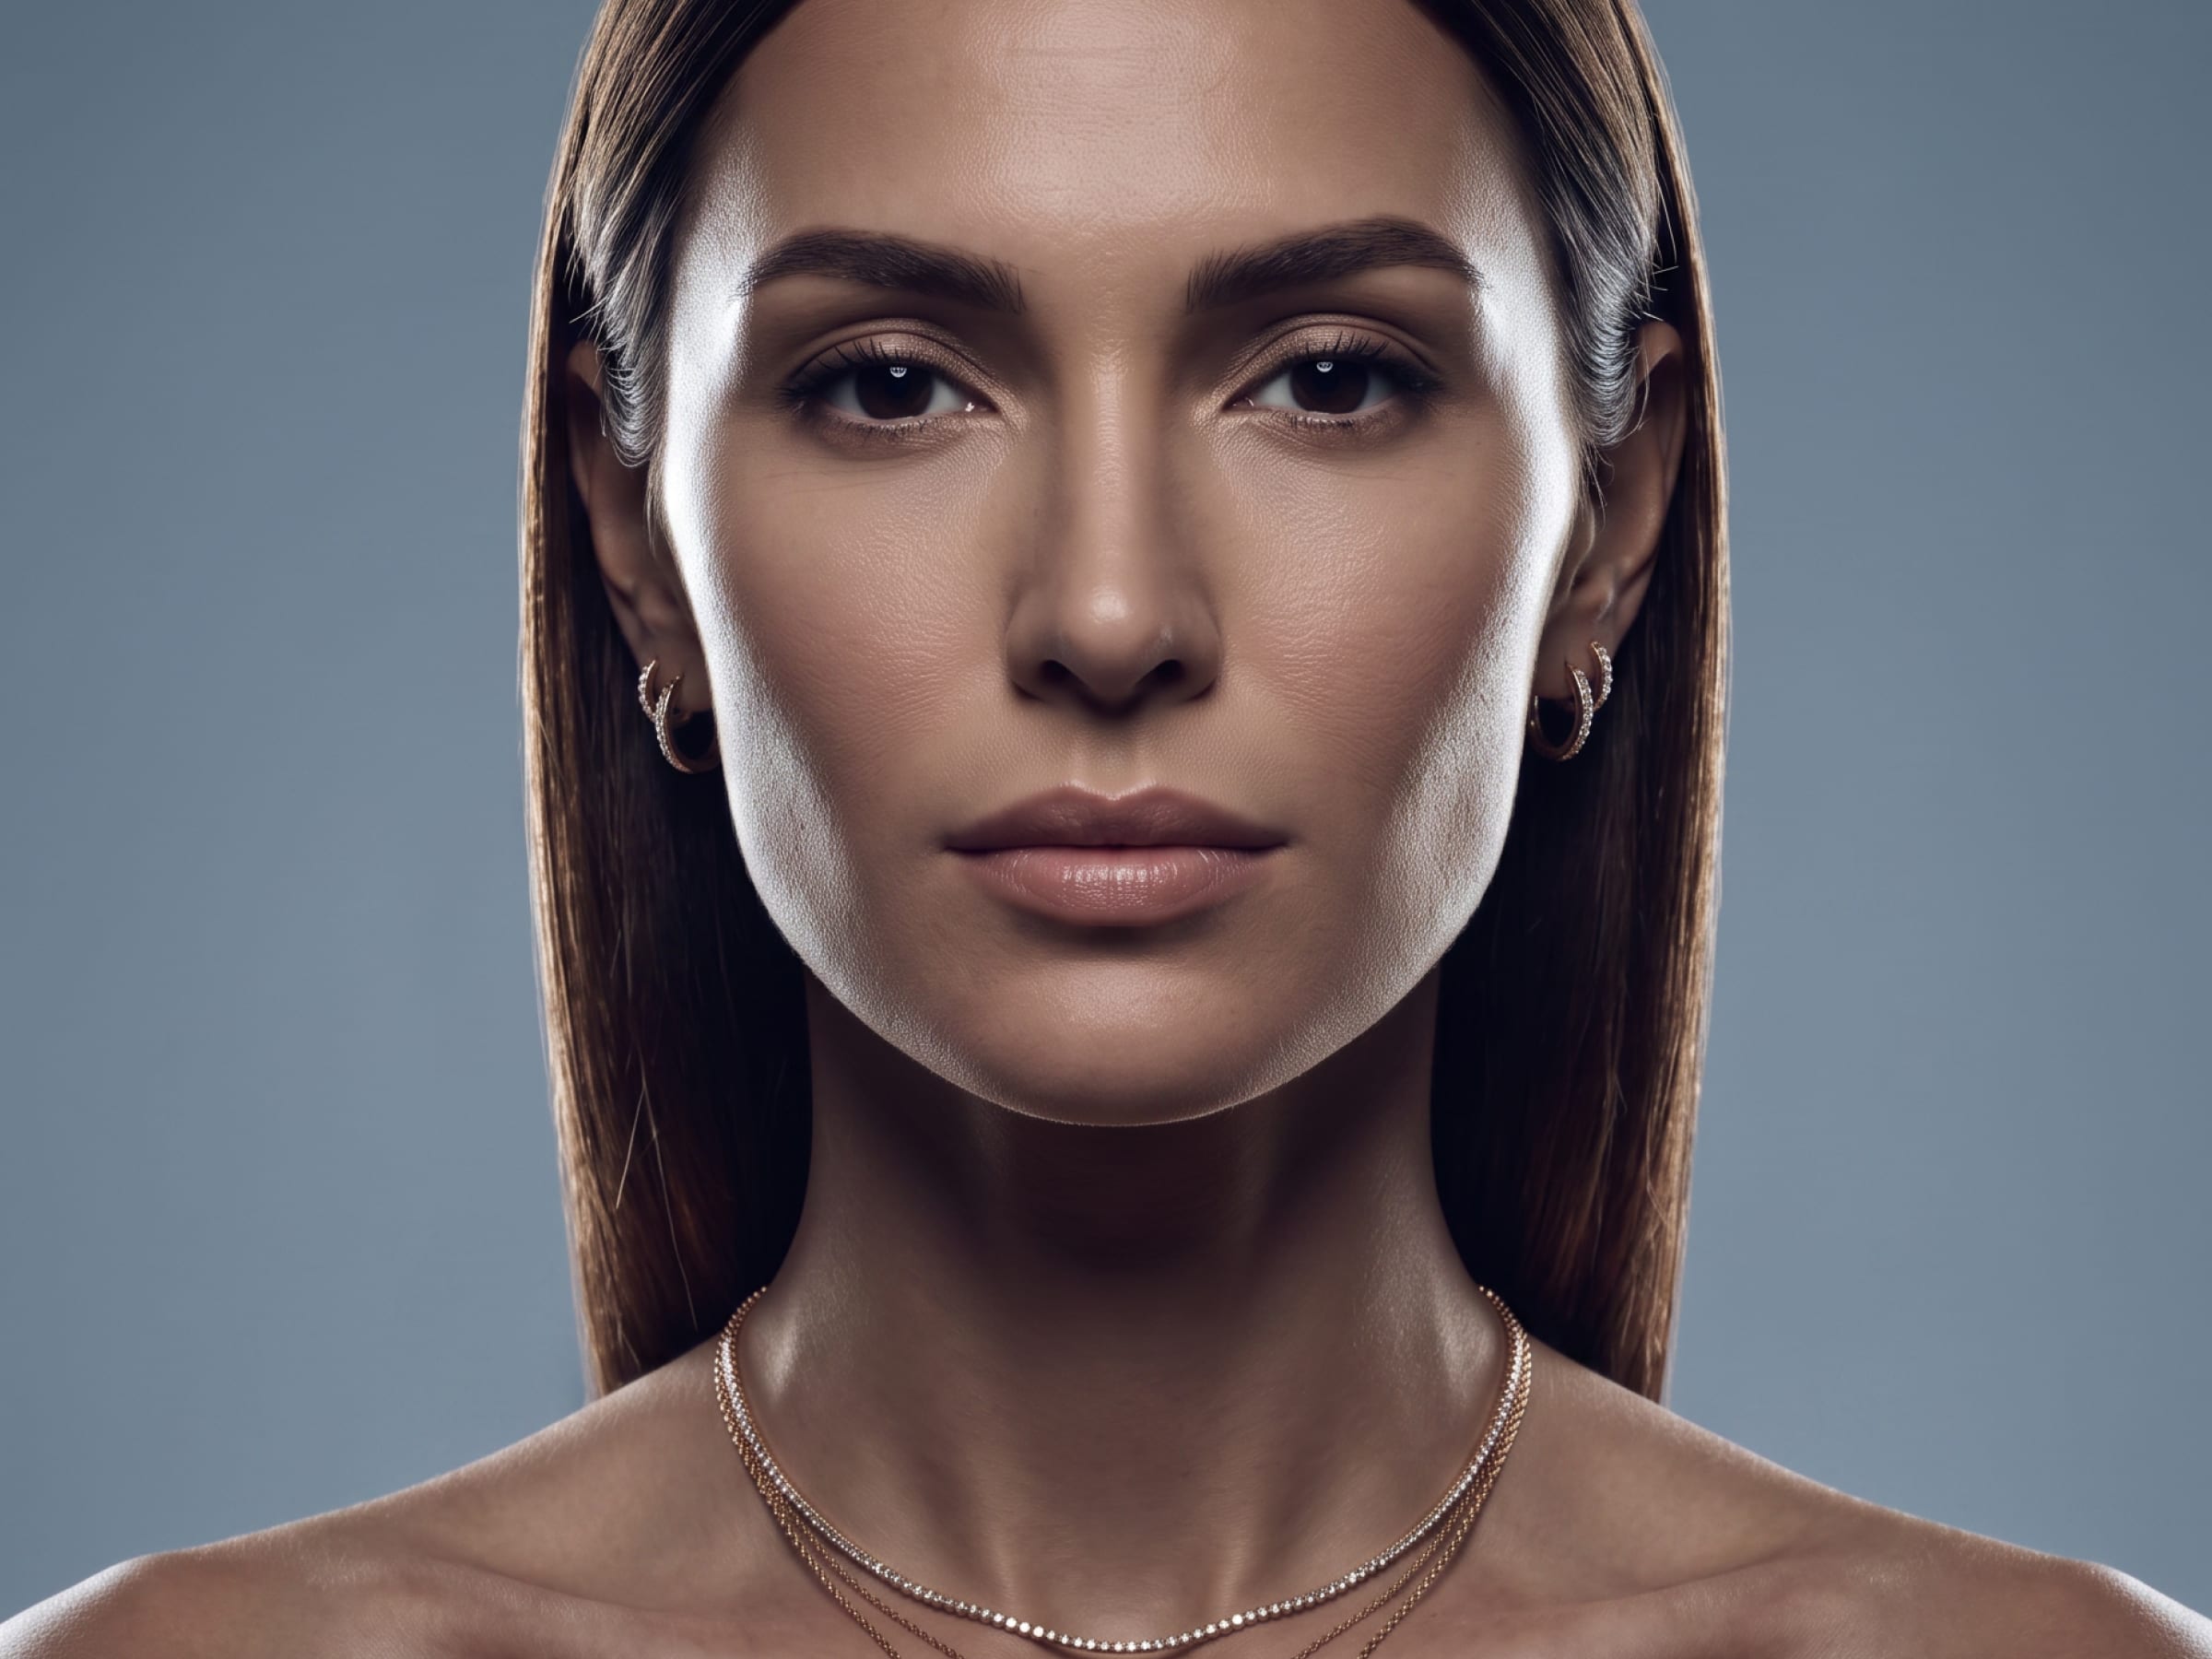
Relight the uploaded portrait using authentic photographic rim lighting while preserving the original subject, facial identity, expression, pose, hairstyle, clothing, jewelry, camera angle, composition, background, and image proportions.
Place one or two controlled backlights slightly behind the subject and outside the frame, aimed toward the back and sides of the head and shoulders. Create a narrow, natural highlight tracing selected outer edges of the hair, jawline, neck, shoulders, and clothing, clearly separating the subject from the background.
Keep the rim light brightest along the edges facing the rear light source, with realistic variation caused by hair density, facial structure, fabric, and body contours. The light should wrap subtly around the silhouette without illuminating the entire front of the subject. Maintain restrained frontal fill so facial features remain readable while the rim light stays visually dominant.
Use realistic light falloff, controlled highlights, natural skin and hair texture, cinematic contrast, and clean photographic depth. The rim should appear optically produced by real studio lights, not drawn around the subject.
Do not create a uniform glowing outline, neon border, halo, graphic stroke, artificial cutout effect, or light around every edge. Do not alter the subject’s identity, anatomy, pose, wardrobe, jewelry, background, framing, or perspective. No visible light sources, excessive haze, coloured glow, glossy artificial skin, or beauty retouching.
05. Silhouette
 [Before][After]
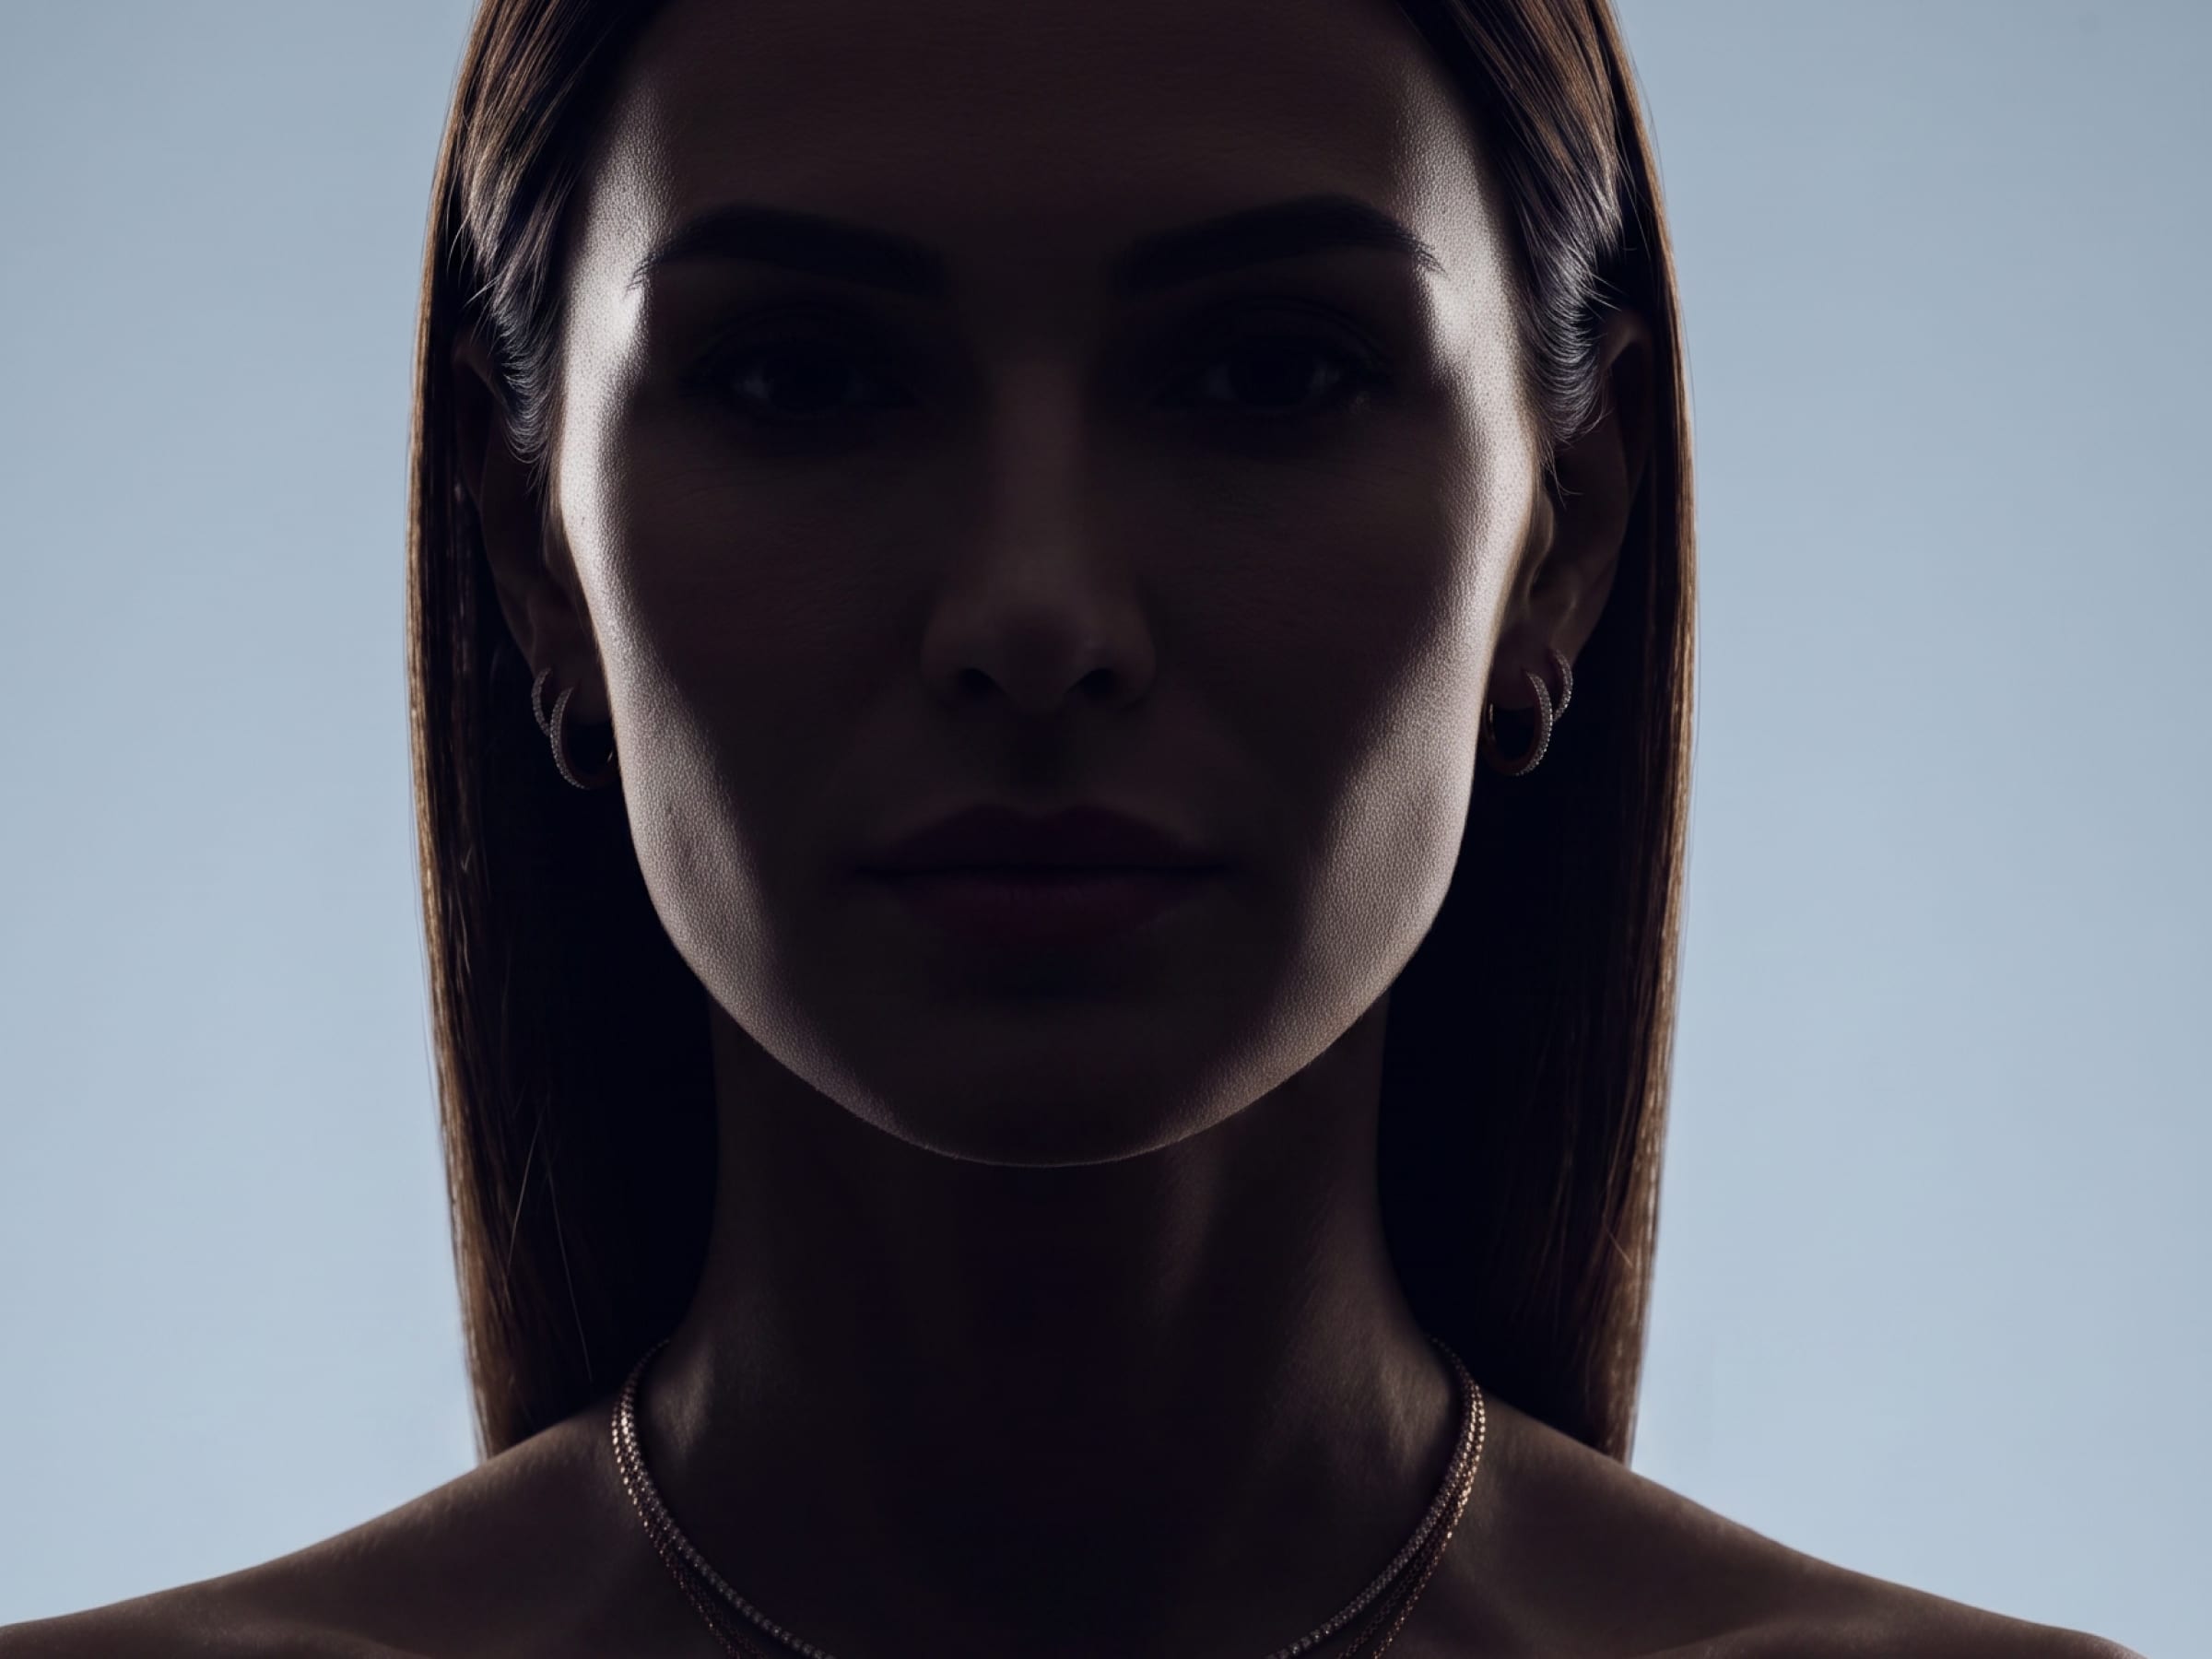
Relight the uploaded image using authentic photographic silhouette lighting while preserving the original subject, identity, pose, hairstyle, clothing, composition, background structure, camera angle, and image proportions.
Place a strong light source behind the subject, directed toward the camera, while removing nearly all frontal illumination. Render the subject as a dark, clearly defined silhouette against a brighter background, preserving the recognizable outline of the head, hair, shoulders, body, clothing, and accessories.
Keep the silhouette naturally shaped by the subject’s real contours. Allow only minimal reflected detail within the darkest areas, without revealing clear facial features. Use realistic backlight falloff, controlled highlights around selected edges, strong separation from the background, and cinematic photographic contrast.
Do not turn the subject into a flat graphic cutout or solid vector shape. Do not add a uniform glowing outline, neon halo, artificial masking, exaggerated lens flare, or fantasy effects. Do not alter the subject’s anatomy, pose, wardrobe, framing, or perspective. The final result should look like the original photograph was professionally captured as a dramatic backlit silhouette.
06. Hard light
 [Before][After]
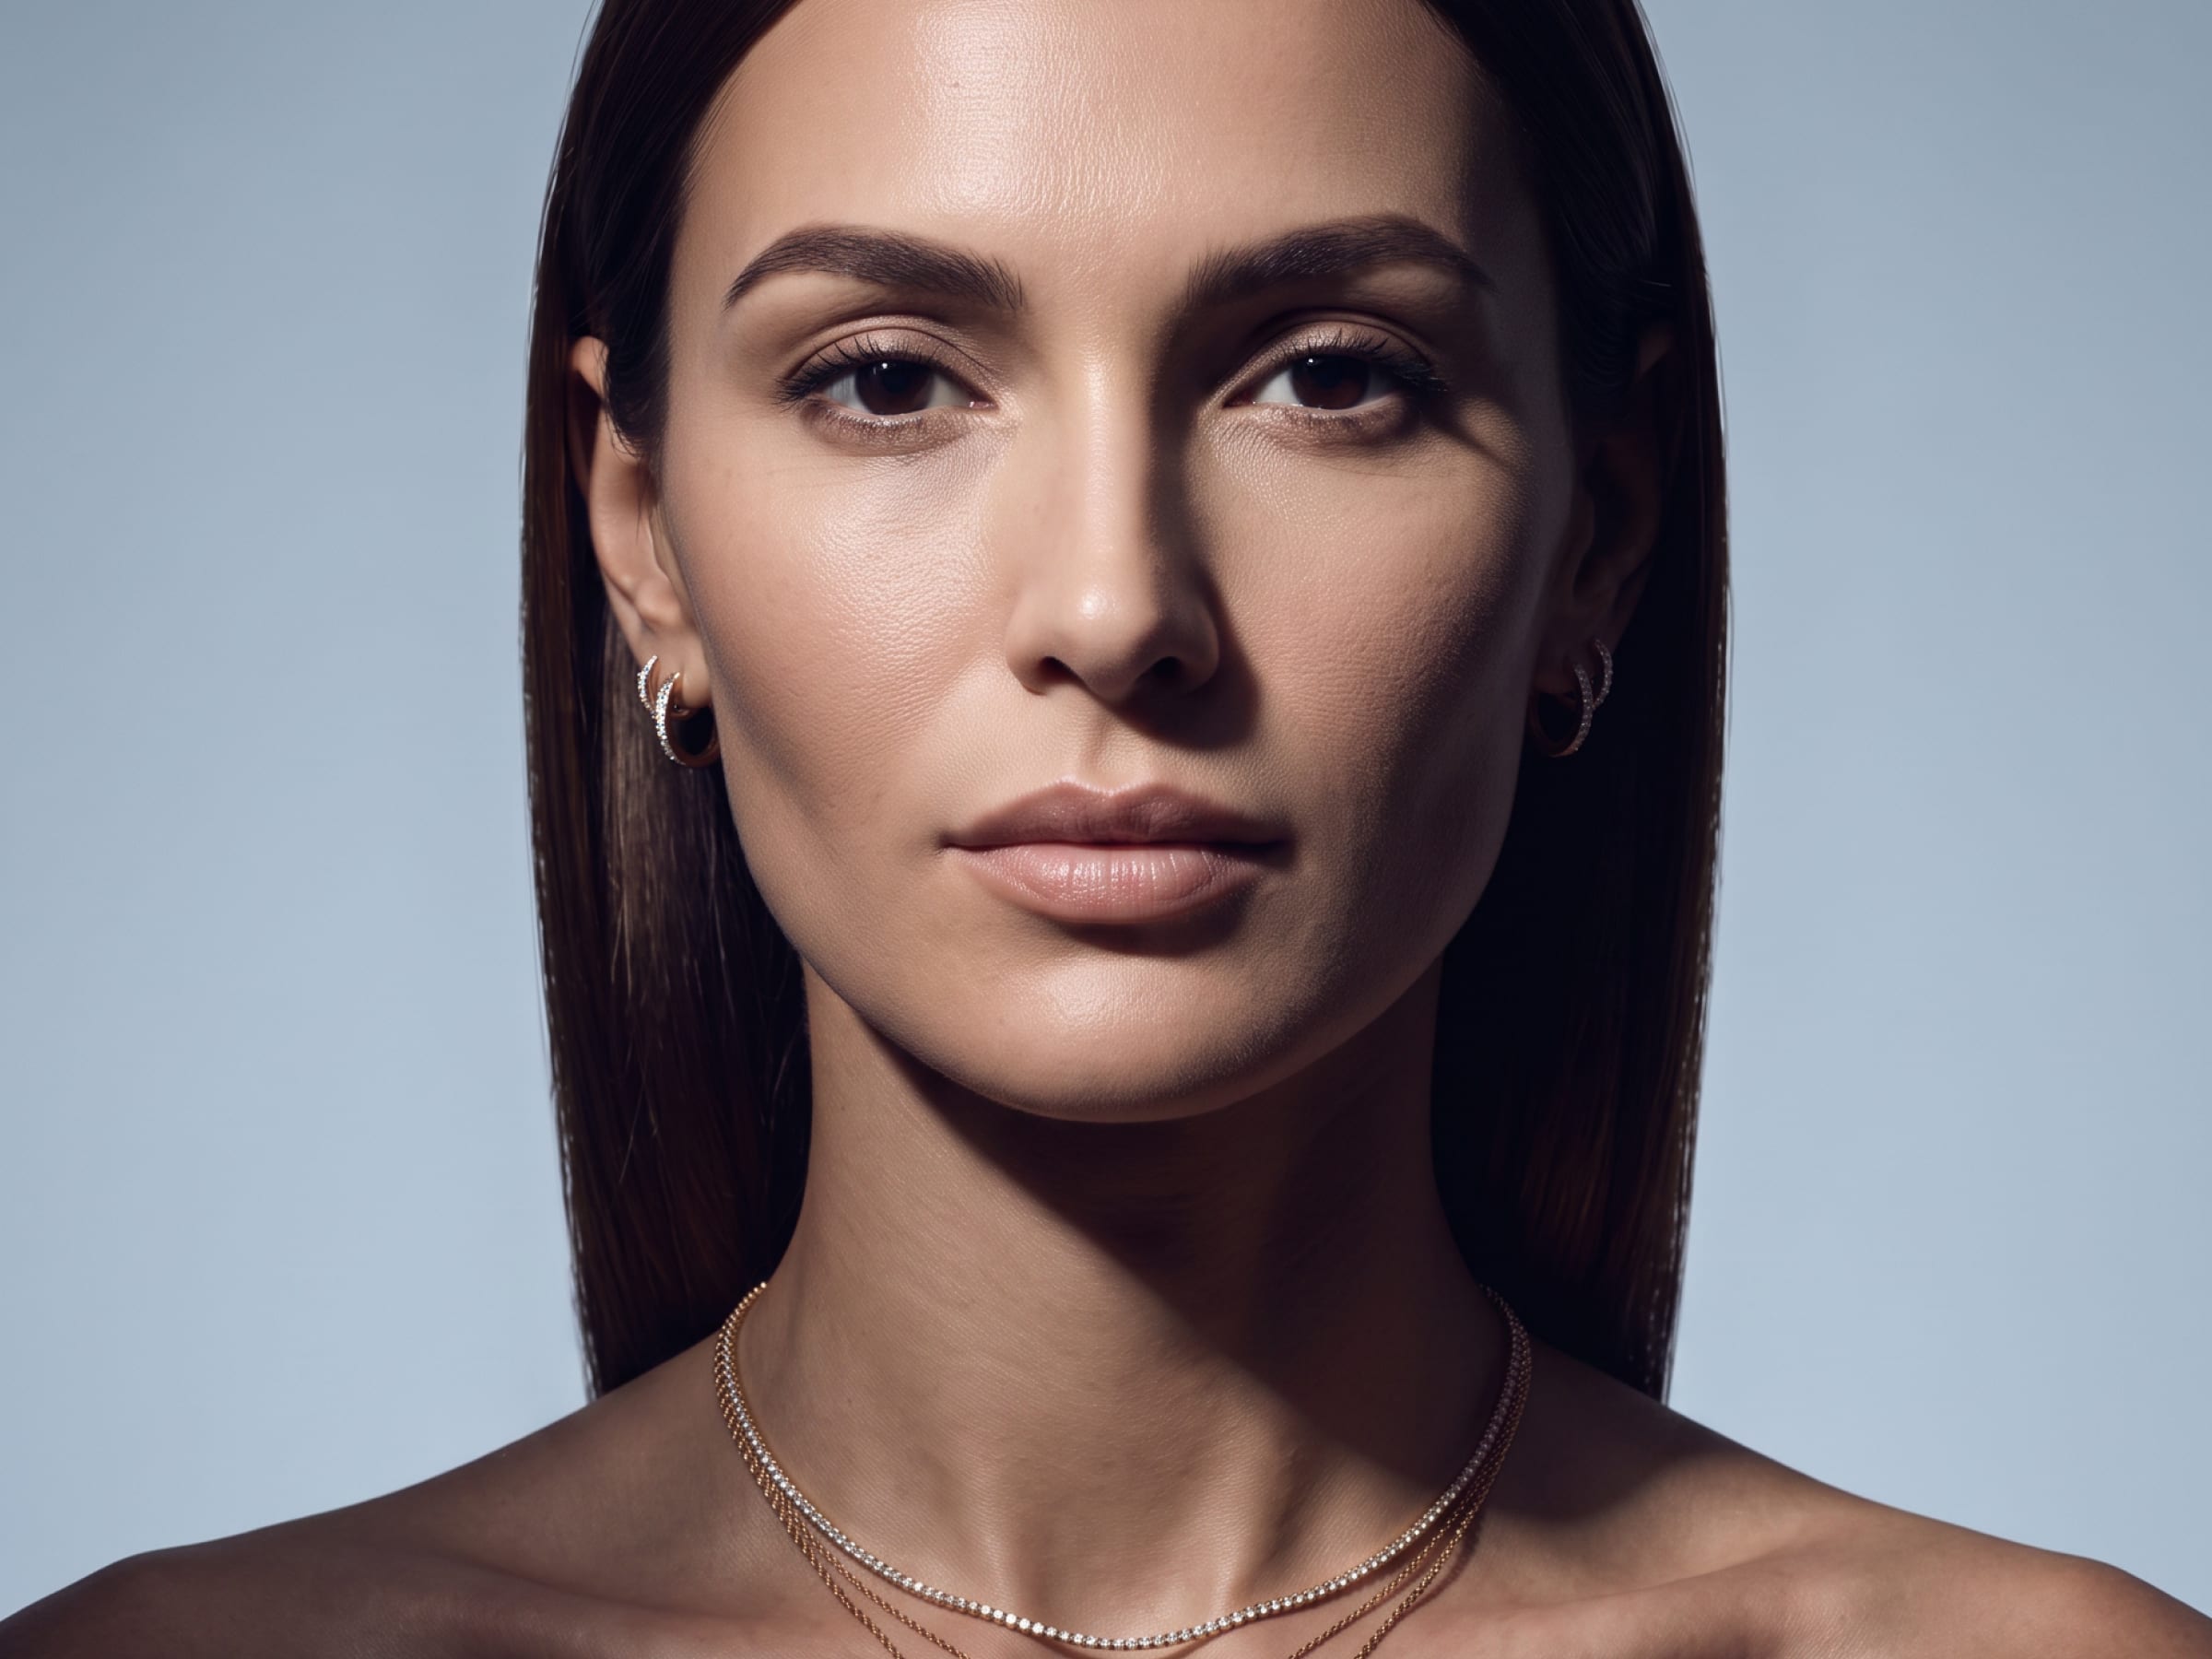
Relight the uploaded image using authentic photographic hard lighting while preserving the original subject, facial identity, expression, pose, hairstyle, clothing, jewelry, composition, camera angle, background, and image proportions.
Use a small, focused directional light source positioned to one side and slightly above the subject. Create crisp, clearly defined shadows with minimal transition between illuminated and shadowed areas. Emphasize the natural structure of the face, including the cheekbones, nose, jawline, lips, neck, shoulders, and collarbones.
Keep the shadow direction physically consistent with the light position. Preserve realistic skin texture, pores, fabric detail, and controlled highlights without smoothing or softening the image. Use strong contrast while retaining enough information in the shadows to keep the subject dimensional and photographic.
Do not create artificial shadow shapes, digital masking, a flat spotlight effect, or random patches of darkness. Do not alter the subject’s identity, anatomy, pose, wardrobe, background, framing, or perspective. No visible light source, excessive glow, haze, glossy artificial skin, beauty retouching, or fantasy effects. The final result should look like the original photograph was professionally captured with a small, direct hard-light source.
07. Soft light
 [Before][After]
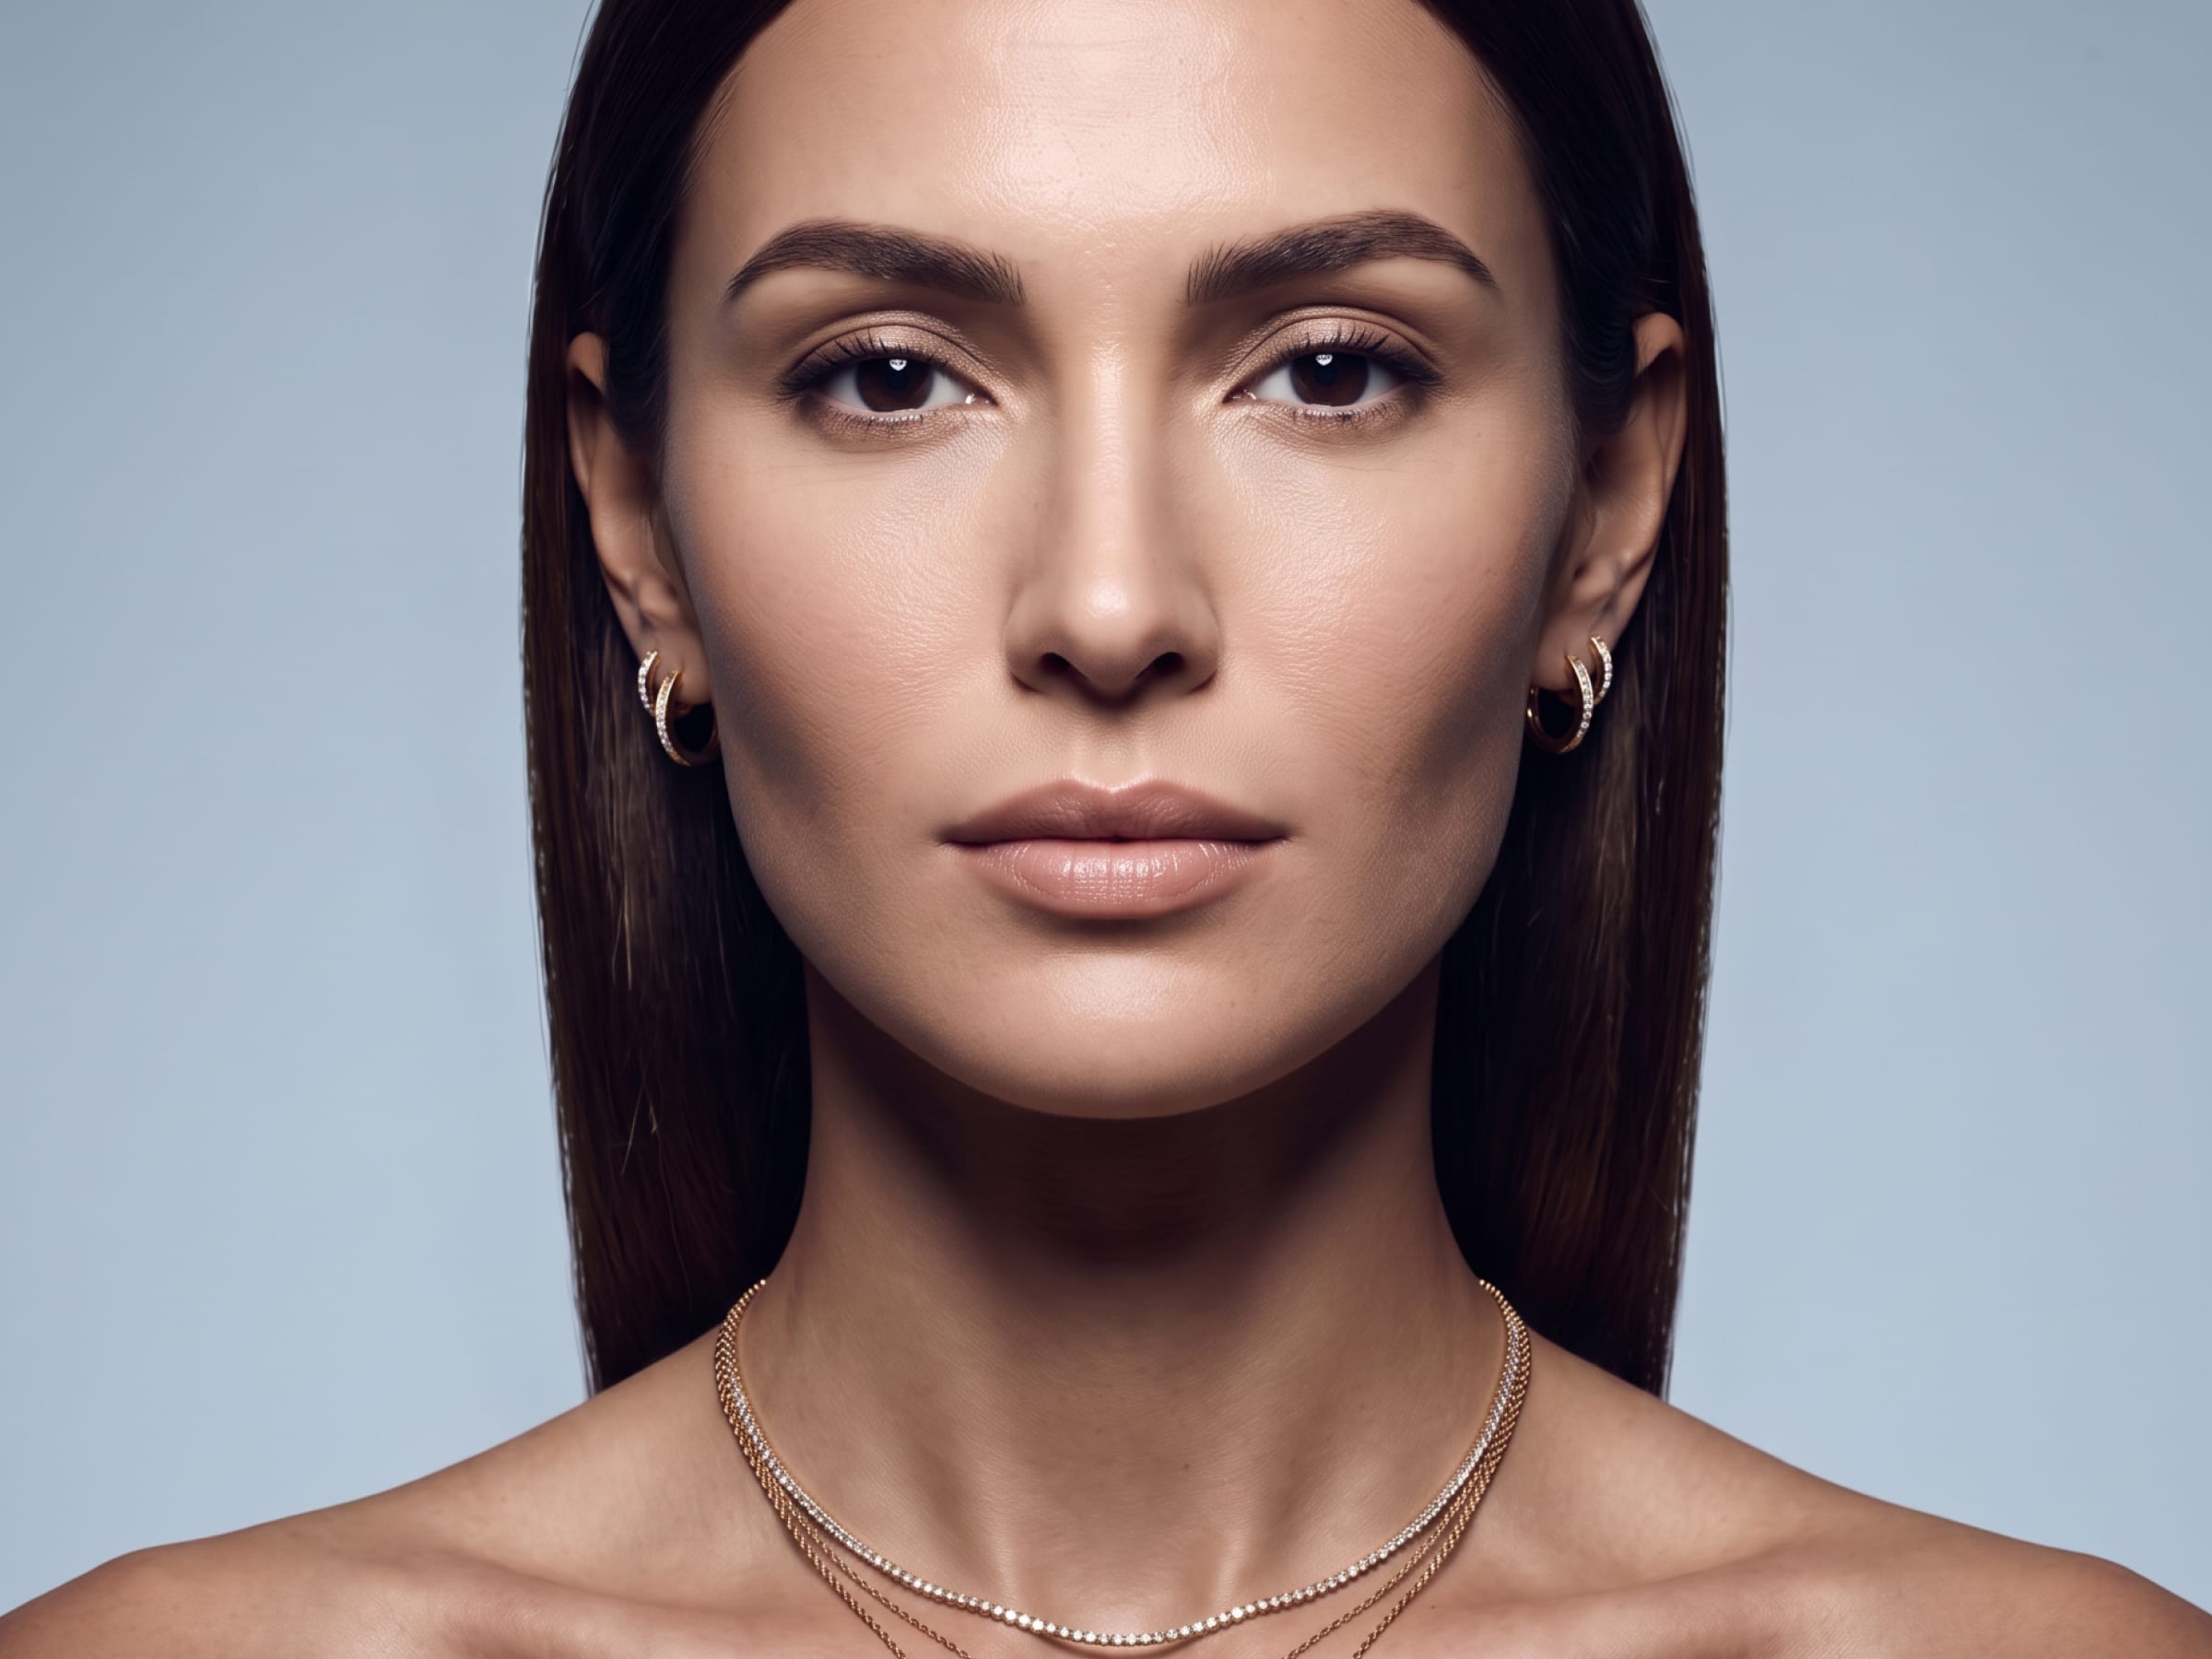
Relight the uploaded image using authentic photographic soft lighting while preserving the original subject, facial identity, expression, pose, hairstyle, clothing, jewelry, composition, camera angle, background, and image proportions.
Use a large diffused light source positioned slightly above and to one side of the subject. Create broad, gentle illumination with smooth transitions between highlights and shadows, minimal edge definition, and natural wraparound light across the face and body.
Maintain flattering facial dimension while softly shaping the cheekbones, nose, jawline, neck, shoulders, and clothing. Keep both eyes clearly visible with subtle natural catchlights. Preserve realistic skin texture, accurate colour, controlled highlights, soft shadow detail, and balanced exposure.
The light should interact naturally with the subject and environment, producing gradual falloff and believable reflections without making the image look flat or artificially bright.
Do not alter the subject’s identity, facial structure, anatomy, pose, wardrobe, jewelry, background, framing, or perspective. No harsh shadows, artificial glow, excessive haze, glossy skin, beauty retouching, overexposure, or fantasy effects. The final result should look like the original photograph was professionally captured using a large diffused soft-light source.
08. High key
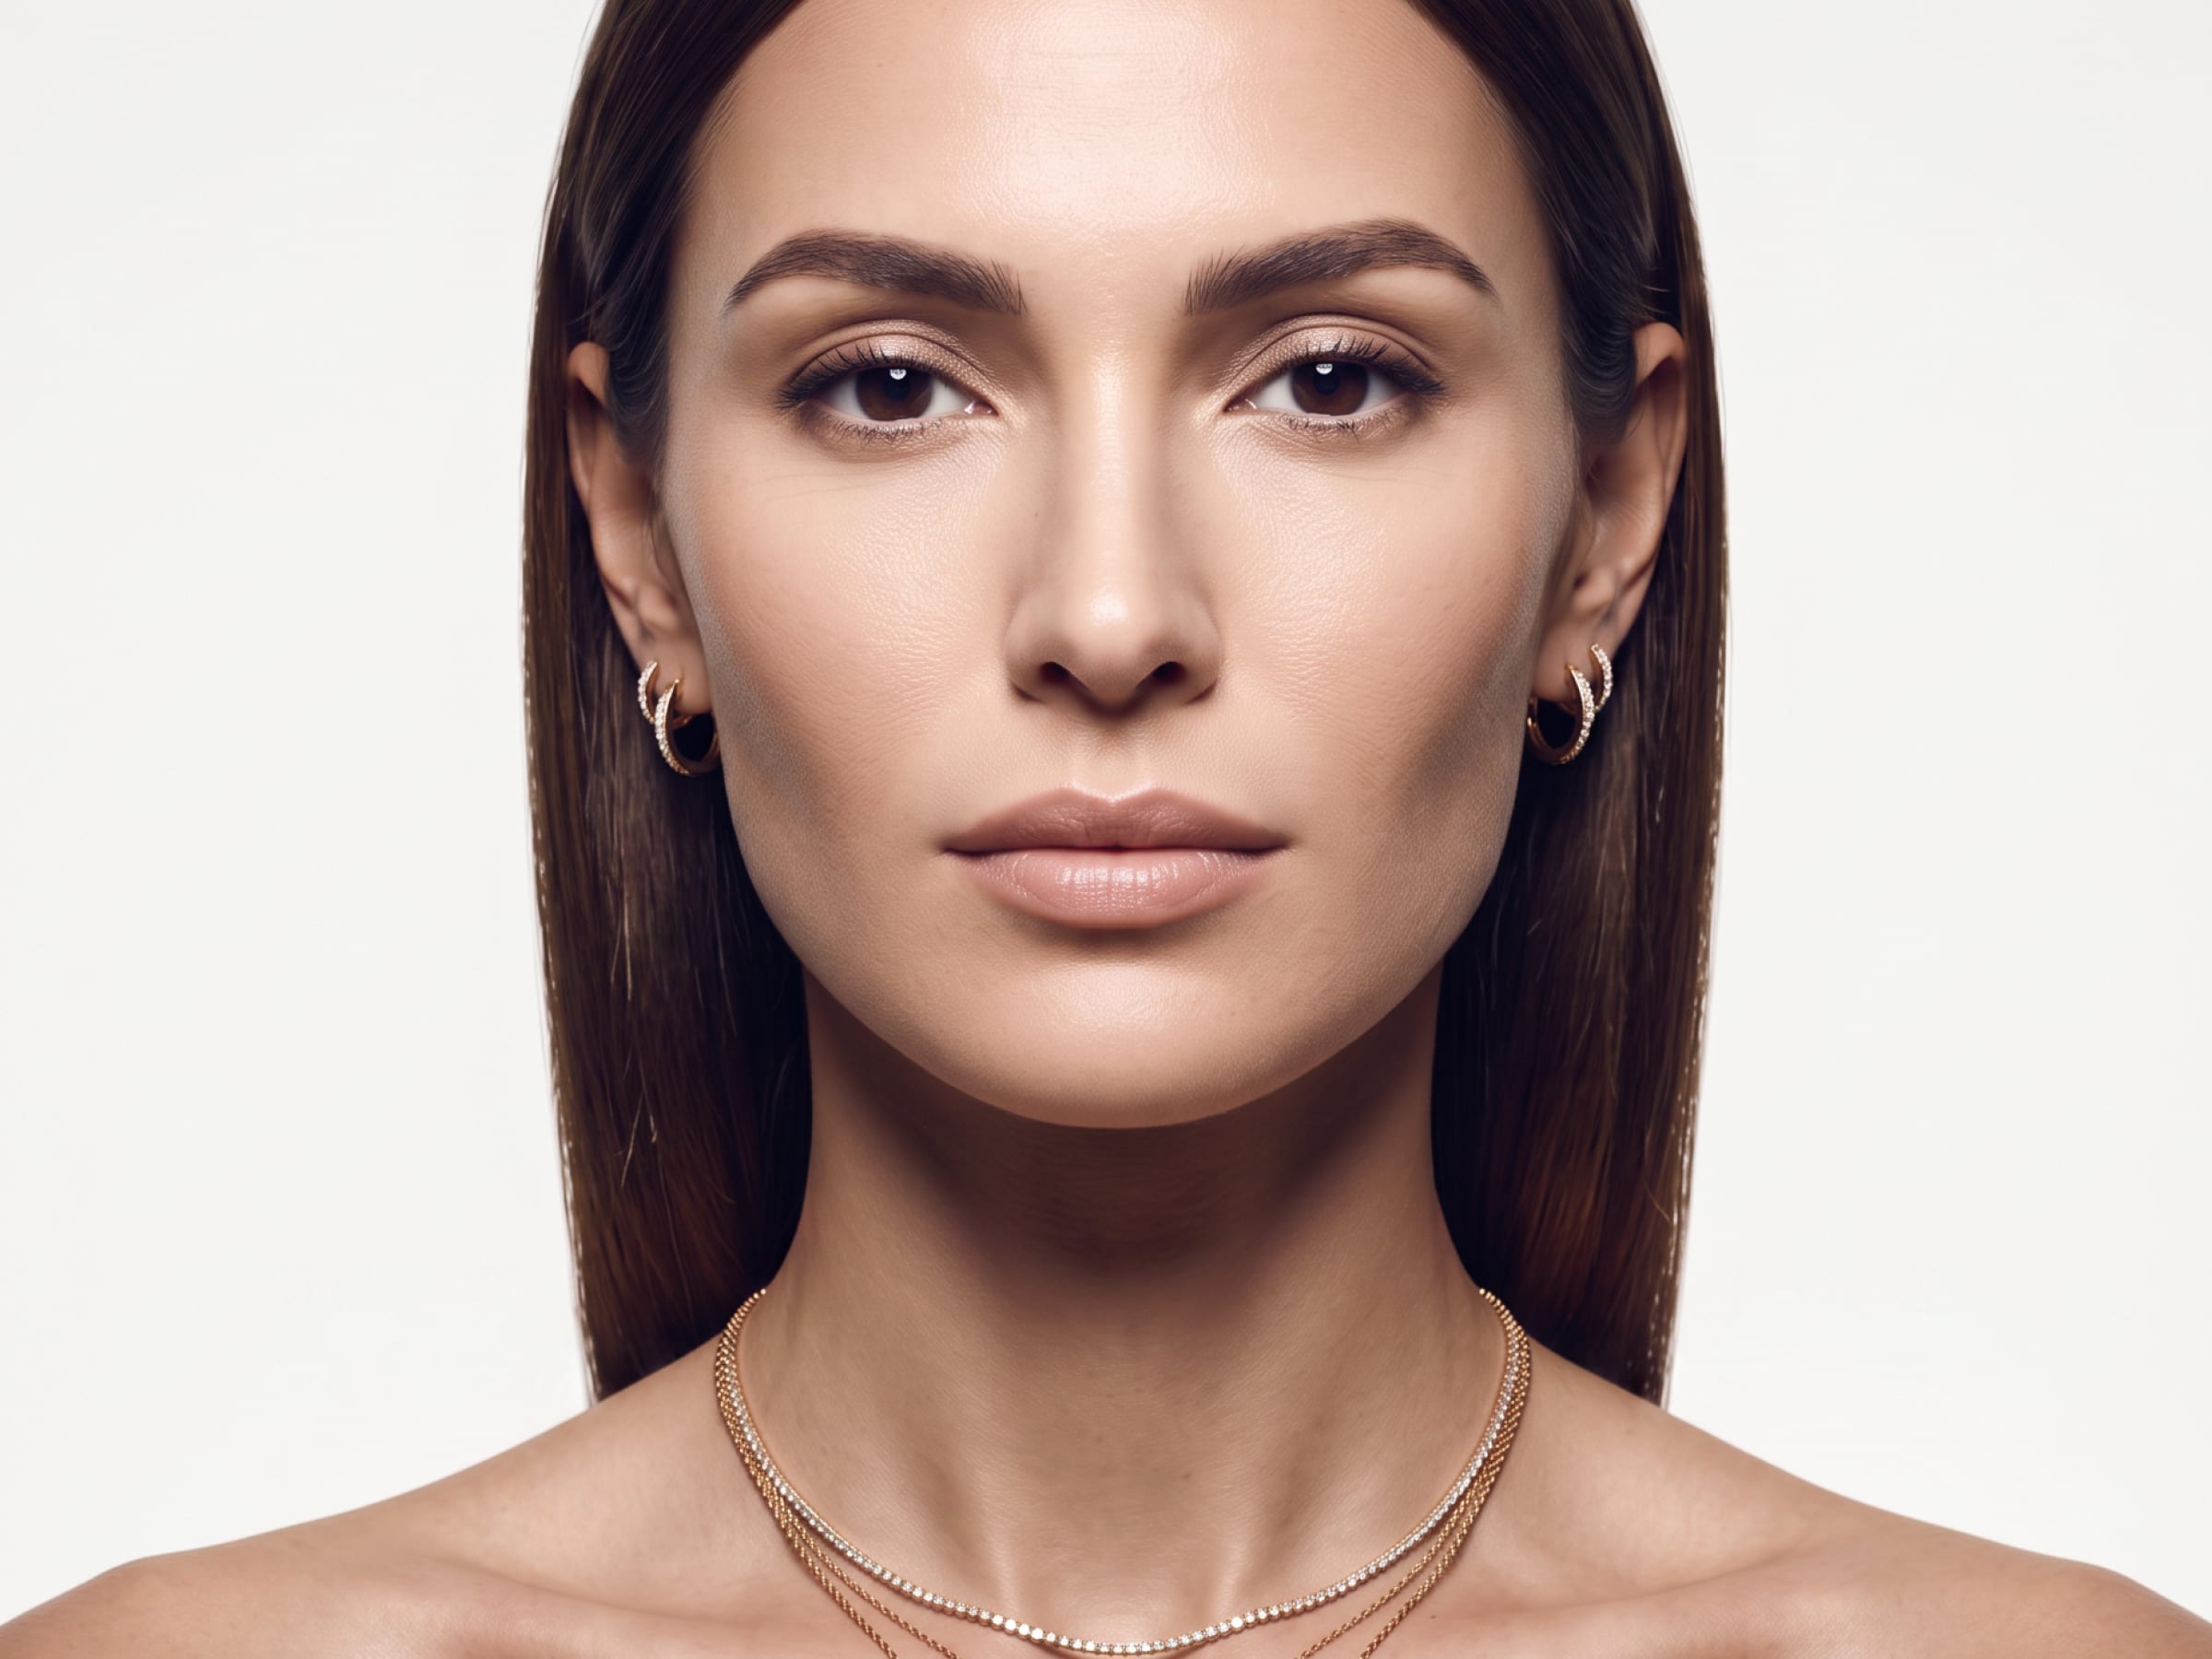 [Before][After]
Relight the uploaded image using authentic photographic high-key lighting while preserving the original subject, facial identity, expression, pose, hairstyle, clothing, jewelry, composition, camera angle, background structure, and image proportions.
Use large diffused frontal and side light sources to create bright, even illumination with low contrast, soft shadows, and clean luminous skin tones. Keep the face fully readable, both eyes evenly illuminated, and the highlights controlled without losing natural texture.
Brighten the background toward a clean white or very light neutral tone while maintaining subtle separation between the subject and the environment. Preserve gentle facial modelling around the cheekbones, nose, jawline, neck, and shoulders so the result remains dimensional rather than flat.
Do not overexpose the skin, erase facial detail, crush the whites, create artificial glow, or apply excessive beauty retouching. Do not alter the subject’s identity, anatomy, pose, wardrobe, framing, or perspective. The final result should look like the original photograph was professionally captured in a polished high-key studio setup.
All eight can come from one base image as each setup is trying to isolate one lighting decision at a time. The writing is not supposed to be clever. It is supposed to leave as little ambiguity as possible about where the light stands and what it does once it gets there.


